To install recessed lighting trim, first turn off the power and remove the existing trim. Then, align the new trim with the recessed light fixture and push it into place until it snaps into position.
Recessed lighting can add a modern and sleek touch to any room, providing a clean and unobtrusive source of lighting. Whether you are looking to replace an old trim or install recessed lighting for the first time, knowing how to properly install the trim is essential.
This guide will walk you through the step-by-step process of installing recessed lighting trim, ensuring a professional and polished look for your space. With a few simple tools and careful attention to safety precautions, you can easily install recessed lighting trim and enjoy the benefits of enhanced lighting in your home or office.
Factors To Consider When Selecting Recessed Lighting Trim
When selecting recessed lighting trim, there are a few factors to consider. Firstly, style and design play a significant role in the overall aesthetics of the room. There are various options available, ranging from modern and sleek to classic and ornate. Consider the existing decor and the desired ambiance you wish to create.
Secondly, finish and color options should be taken into account. Different finishes, such as brushed nickel or matte black, can complement the existing hardware and fixtures in the room. Additionally, the color of the trim can enhance the lighting effect and coordinate with the overall design scheme.
Lastly, compatibility with existing lighting fixtures is crucial. Ensure that the recessed lighting trim you choose is compatible with your current fixtures, including the housing and bulb type. It’s important to double-check the specifications to avoid any installation issues or compatibility conflicts.
Steps To Measure And Determine Trim Size
|
Steps to Measure and Determine Trim Size When installing recessed lighting trim, it is important to measure and determine the appropriate size for your fixtures. Here are a few steps to help you do just that:
By following these steps, you can easily measure and determine the trim size for your recessed lighting installation. Remember to double-check your measurements before making any final decisions to avoid any installation issues. |
Gathering The Necessary Tools And Materials
To successfully install recessed lighting trim, you will need to gather the following tools:
| Tools Required | Materials Checklist |
|---|---|
| Screwdriver | Recessed lighting trim |
| Pliers | Wire connectors |
| Wire strippers | Electrical tape |
| Utility knife | Ladder |
| Tape measure | Circuit tester |
Make sure you have these tools and materials prepared before you start the installation process. Having everything ready will help ensure a smooth and efficient installation.
Credit: www.familyhandyman.com
Turning Off Power And Ensuring Safety
Turning off the power is the first and most important step when installing recessed lighting trim. This ensures the safety of both the installer and the electrical system. Avoiding accidents and electric shock is crucial during the installation process.
| Steps to Turn Off Power to the Lighting Circuit: |
| 1. Locate the electrical panel in your home. |
| 2. Identify the circuit breaker that controls the lighting circuit. |
| 3. Switch the circuit breaker to the “Off” position. |
| 4. Use a non-contact voltage tester to ensure any remaining electrical currents are absent. |
| 5. Once confirmed, you can safely proceed with the installation process. |
These simple but crucial steps protect you from any potential electric shock or damage to the electrical system. Always remember to prioritize safety and take necessary precautions during recessed lighting trim installation.
Detaching Existing Trim And Bulb
To install recessed lighting trim in your home, you first need to detach the existing trim and bulb. Start by carefully removing the trim and bulb from the recessed fixture. Gently twist the trim counterclockwise to detach it from the housing. Once the trim is removed, locate the retaining clips that hold the bulb in place. Squeeze the clips together and pull the bulb out of the socket. It’s important to handle the components with care to avoid any damage or injury.
After removing the trim and bulb, it’s essential to properly handle and dispose of the old components. If your trim and bulb are still in good condition, consider donating them to a local charity or reuse center. If they are damaged or no longer usable, check with your local waste management authority for instructions on how to dispose of them safely and responsibly.
Attaching And Adjusting New Trim
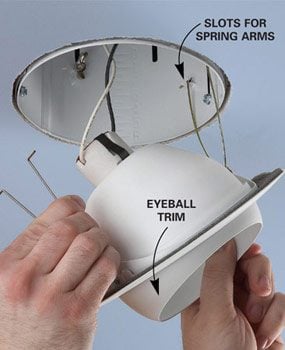
Installing recessed lighting trim involves attaching and adjusting the new trim to align it with the fixture and achieve the desired lighting direction. To start, make sure the power is turned off before beginning any work. Next, remove the existing trim by unscrewing the retaining clips or springs. With the old trim removed, take the new trim and align it with the housing opening. Gently push the trim up into place, making sure it fits snugly against the ceiling. If the trim has adjustable features, such as a swivel or tilt mechanism, adjust it to the desired position to direct the light where needed. Once the trim is aligned and adjusted, secure it in place by either snapping the retaining clips or fastening the springs. Finally, turn the power back on and test the recessed lighting to ensure it is functioning properly.
Securing And Testing The Trim
After you have selected and installed the appropriate trim for your recessed lighting, it is important to secure it in place and test the system for proper functionality. To fix the trim in place, carefully position it over the housing and make sure it fits snugly. Most recessed lighting trims come with clips or springs that need to be engaged to hold them in place. Gently push the trim up towards the ceiling until the clips or springs snap into position.
Testing the lighting system is crucial to ensure that everything is working as intended. Turn the power back on and flip the light switch. Observe if the trim is properly aligned and the light is evenly distributed. Check for any flickering or dimming. If you detect any issues, double-check the installation and connections. Make sure all electrical components are securely connected.
Regularly inspecting and maintaining your recessed lighting trim will help keep it functioning optimally and enhance the overall appearance of your space.
Dim Or Flickering Lights
If you are experiencing dim or flickering lights with your recessed lighting trim, there are a few potential causes that you should consider. One possible cause is a loose connection in the wiring. Check the connections between the trim and the housing to ensure they are secure and tight. Another potential cause is a faulty dimmer switch. If you have a dimmer switch installed, try replacing it with a new one to see if that resolves the issue. Additionally, using the wrong wattage of light bulb can also cause dim or flickering lights. Make sure you are using the correct wattage as recommended by the manufacturer. Lastly, if you have tried the above solutions and are still experiencing issues, it may be best to consult a professional electrician to diagnose and resolve the problem.
Misalignment Of Trim
When installing recessed lighting trim, one common issue that may arise is misalignment. This can be due to several reasons, including:
| Poor Installation | Ensure that the trim is securely and properly installed, as an improper installation can lead to misalignment. |
| Inaccurate Measurements | Double-check your measurements before cutting the hole for the recessed light. Incorrect measurements can result in a trim that doesn’t align correctly. |
| Uneven Ceiling Surface | If your ceiling surface is uneven, it can affect the alignment of the trim. In such cases, additional adjustments may be necessary to achieve proper alignment. |
| Manufacturing Defects | In rare cases, misalignment can be caused by manufacturing defects in the trim itself. If you suspect this to be the case, contact the manufacturer for assistance. |
Regardless of the reason, it is important to address misalignment promptly. Adjusting and aligning the trim correctly will not only improve the aesthetic appeal of the recessed lighting but also ensure proper functionality.
Discoloration Or Peeling Of Trim Finish
The discoloration or peeling of trim finish in recessed lighting can be caused by various factors. One common reason is exposure to excessive heat or moisture. High temperatures or humidity levels can cause the trim finish to degrade over time, leading to discoloration or peeling. Another possible cause is poor quality or improper installation of the trim. If the trim is not securely attached or does not align properly with the ceiling, it can lead to moisture seeping in and damaging the finish.
To prevent or resolve this issue, there are several preventive measures and solutions you can consider. Firstly, ensure that the recessed lighting fixtures you choose are suitable for the specific environment they will be installed in. Opt for trims with a durable and heat-resistant finish. Secondly, make sure the trim is properly installed and sealed to prevent any moisture ingress. Additionally, consider using a moisture-resistant paint or coating specifically designed for recessed lighting trims to provide an extra layer of protection. Regular cleaning and maintenance of the trims can also help preserve their appearance and prevent discoloration or peeling.
Frequently Asked Questions For How To Install Recessed Lighting Trim
How Do You Install Recessed Led Trim?
To install recessed LED trim, first, turn off the power. Then remove the old trim and bulb. Next, attach the LED trim to the housing and secure it using the manufacturer’s instructions. Finally, turn the power back on to test the new recessed LED trim.
What Is The Most Popular Trim Used With Recessed Lighting?
The most popular trim used with recessed lighting is the open trim. It provides a clean and minimalistic look that complements various interior styles.
How Do You Install Recessed Lighting For Beginners?
To install recessed lighting for beginners, follow these steps: 1. Choose the suitable location for your lights. 2. Cut holes in the ceiling according to the light fixture dimensions. 3. Connect the wiring and secure the fixture in place. 4.
Install the light bulb and attach the trim. 5. Test the lights for proper functioning. Remember, always consult an electrician if you’re unsure or unfamiliar with electrical work.
Conclusion
To sum up, installing recessed lighting trim is a simple and transformative project that can greatly enhance the ambiance and functionality of any space. By following these step-by-step instructions, you can confidently tackle this task with ease. Remember to carefully consider the type of trim you want, measure accurately, and ensure proper wiring.
With a little patience and attention to detail, you can successfully upgrade your lighting and brighten up your home. So, go ahead and get started on this DIY project today!