To install a new zipper slider, gently remove the old slider by pulling it off the zipper teeth while holding the zipper tape taut. Then, position the new slider onto the teeth and carefully slide it up and down to ensure smooth functionality.
Tools Required
To install a new zipper slider, you will need a few tools and materials. The necessary items include a pair of pliers, a new zipper slider, a small screwdriver or awl, and some beeswax or soap. The pliers are used to remove the old slider from the zipper tape, while the screwdriver or awl can be used to pry open the zipper stop if necessary. Beeswax or soap can help ease the slider onto the tape smoothly. It’s important to have all these tools ready before starting the installation process. Having the right tools and materials will ensure a successful installation of a new zipper slider.
Step 1: Assessing The Zipper Slider
| Step 1: Assessing the Zipper Slider |
| Understanding the condition of the current zipper slider: |
| Assessing the condition of the zipper slider is the first step towards installing a new one. Carefully inspect the slider to determine if there are any issues or damages. Look for signs of wear and tear, such as broken or missing teeth, rust, or bent components. Identifying these problems will help you choose the appropriate replacement slider for your zipper. It’s important to assess the slider thoroughly to avoid any future issues with the zipper. Once you have a clear understanding of the condition of the current slider, you can move on to the next steps in the installation process. |
Step 2: Choosing The Right Replacement Slider
Choosing the right replacement slider for your zipper is an important step in the installation process. When considering which slider to buy, there are several factors to keep in mind. Firstly, you need to determine the type of slider needed for your zipper. There are a variety of different types available, including coil, invisible, metal, and plastic sliders. Each type has its own advantages and is suitable for different types of fabric and usage. Secondly, you should consider the size of the slider. Zipper sliders come in various sizes, and it’s essential to choose the one that matches the teeth of your zipper. A slider that is too small or too large may cause the zipper to malfunction. Lastly, keep the color and style of the slider in mind to ensure it matches your garment or project. By carefully considering these factors, you can find the perfect replacement zipper slider for your needs.
Credit: m.youtube.com
Step 3: Removing The Old Slider
htmlProper Techniques To Remove The Existing Zipper Slider
The process of removing an old zipper slider requires careful execution to avoid any damage to the zipper tape or teeth. Here are some recommended steps:
| 1. | Carefully examine the slider and identify the attachment method (most commonly a small metal stop at the bottom). |
| 2. | Using a pair of pliers or a seam ripper, gently pry open the metal stop to loosen the slider’s grip on the zipper tape. |
| 3. | Once the slider is loosened, slide it down and off the zipper teeth. |
| 4. | If you encounter resistance, avoid applying excessive force which can damage the teeth or tape. Instead, use small back and forth movements to wiggle the slider until it comes off. |
| 5. | Inspect the zipper tape and teeth for any signs of damage and address them before installing the new slider. |
By following these techniques, you’ll be able to safely remove the old zipper slider without causing any harm to the zipper itself. Next, we’ll move on to Step 4: Installing the New Slider.
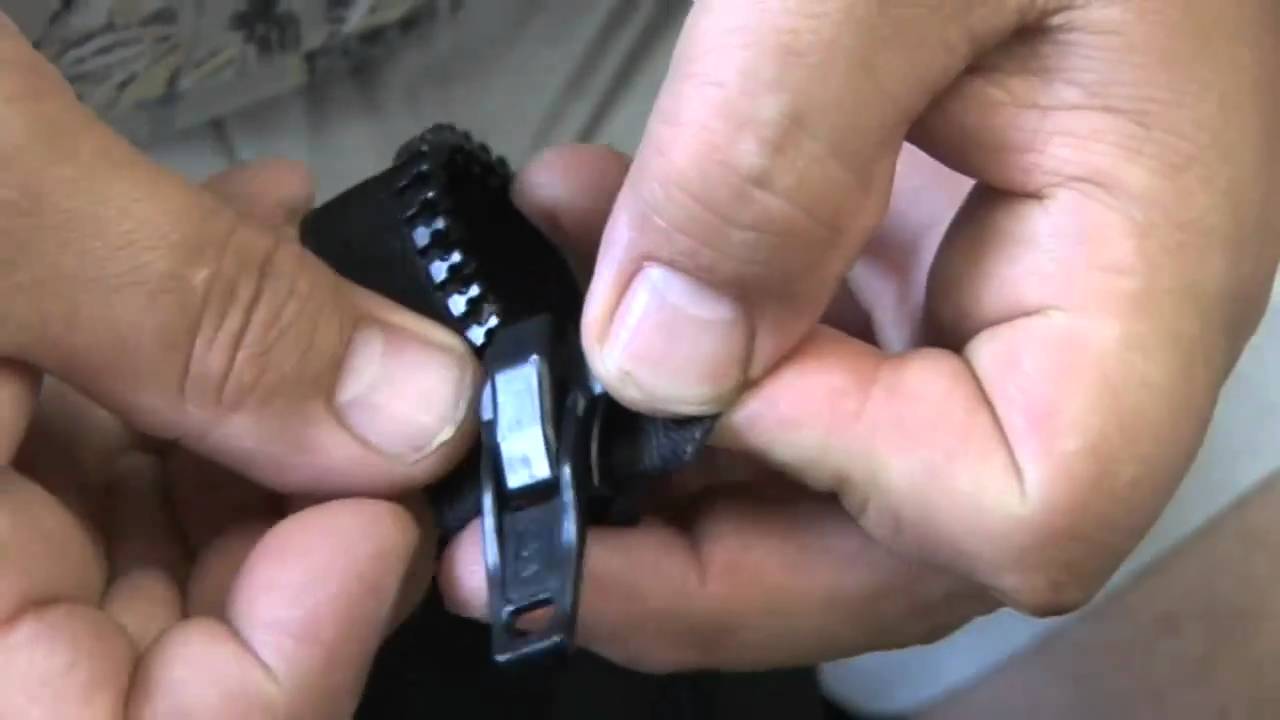
Step 4: Installing The New Slider
Step 4: Installing the New Slider
Step-by-step process of attaching the replacement zipper slider
Attaching a new zipper slider is a simple task that requires proper alignment and positioning. Here’s how you can do it:
- Begin by turning the garment inside out to access the zipper.
- Hold the new zipper slider with both hands, making sure the pull tab is facing up.
- Align the zipper teeth with the slider, ensuring that they fit snugly into the groove.
- Gently slide the zipper slider along the teeth, moving it up or down depending on the desired open or closed position.
- Once you have reached the end of the zipper, test the slider by opening and closing the zipper a few times.
- If the zipper functions smoothly, you have successfully installed the new slider. If not, repeat the process, double-checking the alignment and positioning of the slider.
Remember, taking your time and following these steps carefully will ensure a properly installed zipper slider that will last.
Step 5: Testing The Zipper
Step 5: Testing the Zipper
Once you have installed the new zipper slider, it is important to check its functionality and smooth operation. This ensures that the zipper will work properly and without any issues. Test the zipper by carefully zipping it up and down several times, paying attention to how smoothly it moves along the zipper teeth. If the zipper feels stiff or gets stuck at any point, gently pull it back and try again.
If you encounter any issues with the newly installed zipper slider, troubleshoot them as follows:
- Make sure that the zipper slider is correctly aligned with the teeth.
- Check for any obstructions or fabric caught in the zipper which may be causing it to jam.
- If the zipper is still not functioning smoothly, you can apply a small amount of zipper lubricant to the teeth and slider mechanism to help reduce friction.
- In some cases, the zipper slider may need to be replaced again if it is defective.
Tips And Tricks For Installing Zipper Sliders
Tips and Tricks for Installing Zipper Sliders
Helpful tips and tricks to make the installation process easier and more efficient:
1. Prepare the zipper: Before installing a new zipper slider, ensure that the zipper tape is clean and free from any debris or sticky residues. You can use a mild detergent or rubbing alcohol to clean the tape if necessary.
2. Select the right replacement slider: When replacing a zipper slider, it’s important to choose a slider that matches the size, type, and color of your existing zipper. Check the back of the slider for any imprinted codes or numbers to ensure a proper fit.
3. Remove the old slider: Use small pliers or tweezers to gently pry open the old slider and slide it off the zipper tape. Be careful not to damage the teeth or fabric as you remove it.
4. Align and insert the new slider: Insert the bottom end of the zipper tape into the new slider and align the teeth properly. Slowly slide the slider along the zipper tape, applying gentle pressure until it moves smoothly.
5. Test the zipper: Once the new slider is installed, test the zipper by sliding it up and down a few times to ensure smooth operation. Make any necessary adjustments if the zipper gets stuck or doesn’t close properly.
Common mistakes to avoid when replacing zipper sliders:
| Mistake | Solution |
|---|---|
| Installing a slider of the wrong size | Check the back of the old slider for size codes or numbers and match it with the new slider. |
| Forcing the slider, causing damage | Apply gentle pressure and make sure the teeth align properly before sliding the new slider onto the tape. |
| Not cleaning the zipper tape | Use a mild detergent or rubbing alcohol to remove any dirt or sticky residues from the tape before installing the new slider. |
Maintenance And Care For Zipper Sliders
Proper maintenance techniques are essential to prolong the lifespan of your zipper sliders. Regular cleaning and lubricating are recommended for smooth zipper operation. To clean your zipper sliders, gently wipe away any dirt or debris using a soft cloth or brush. Avoid using harsh chemical cleaners, as they can damage the sliders. After cleaning, applying a lubricant specifically designed for zippers can help to keep them running smoothly. Silicone-based lubricants are particularly effective for reducing friction and preventing the sliders from getting stuck. Remember to apply the lubricant sparingly, as using too much can actually attract more dirt and debris. By consistently following these maintenance practices, you can ensure that your zipper sliders will remain in optimal condition for a long time.
Frequently Asked Questions On How To Install New Zipper Slider
How Do You Replace A Zipper Slider?
To replace a zipper slider, follow these steps: 1. Use a flathead screwdriver to remove the old slider. 2. Slide the new slider onto the zipper teeth, making sure it aligns properly. 3. Use pliers to secure the slider in place.
4. Test the zipper to ensure it functions smoothly.
Is It Easy To Replace A Zipper Slider?
Yes, replacing a zipper slider is relatively easy. You can do it yourself with some basic tools and a bit of patience. Just make sure to buy the right size of slider and follow a step-by-step guide for a successful replacement.
How Do You Put A Zipper Back On Track With A Fork?
To put a zipper back on track with a fork, follow these steps: 1. Open the zipper all the way. 2. Align both sides of the zipper teeth together. 3. Insert the fork between the teeth, starting at the bottom.
4. Apply gentle pressure and move the fork along the zipper’s length. 5. Continue until the zipper is securely back on track.
Conclusion
Installing a new zipper slider is a simple yet effective way to extend the life of your garments and accessories. By following the step-by-step guide provided in this blog post, you can easily replace a worn-out or broken slider and restore functionality to your zipper.
Remember to choose the correct size and type of slider for your zipper to ensure a proper fit. With a little patience and practice, you’ll be able to master this skill and confidently tackle zipper repairs in the future. Happy zipping!