Installing an invisible dog fence involves digging a trench, burying the wire, connecting it to the transmitter, and training your dog to respond to the fence’s warning signals. An invisible dog fence can provide a safe and secure way to contain your dog without the need for physical boundaries like traditional fences.
By following a few simple steps, you can have an invisible dog fence installed in no time. This article will guide you through the process, providing clear and concise instructions for each step. So, if you’re ready to create a safe and secure environment for your furry friend, let’s get started with the installation process.
Determine The Optimal Fence Layout
When installing an invisible dog fence, it is important to determine the optimal fence layout. First, assess the size and shape of your property. Take into consideration any irregularities or unique features that may affect the boundary. Next, identify potential boundary areas where you want to restrict your dog’s access. This could include the perimeter of your yard or specific sections within it. Finally, account for landscaping and obstacles. Consider any trees, shrubs, or structures that may need to be avoided or incorporated into the fence layout. By carefully considering these factors, you can create a layout that suits your property’s specific needs and ensures the effective containment of your furry friend.
Select The Right Invisible Dog Fence System
When installing an invisible dog fence, it is important to select the right system for your needs. Start by researching the different types of systems available. Compare features and benefits of each system to find the best fit. Consider factors such as coverage area, number of dogs, and customization options.
Prepare For Installation
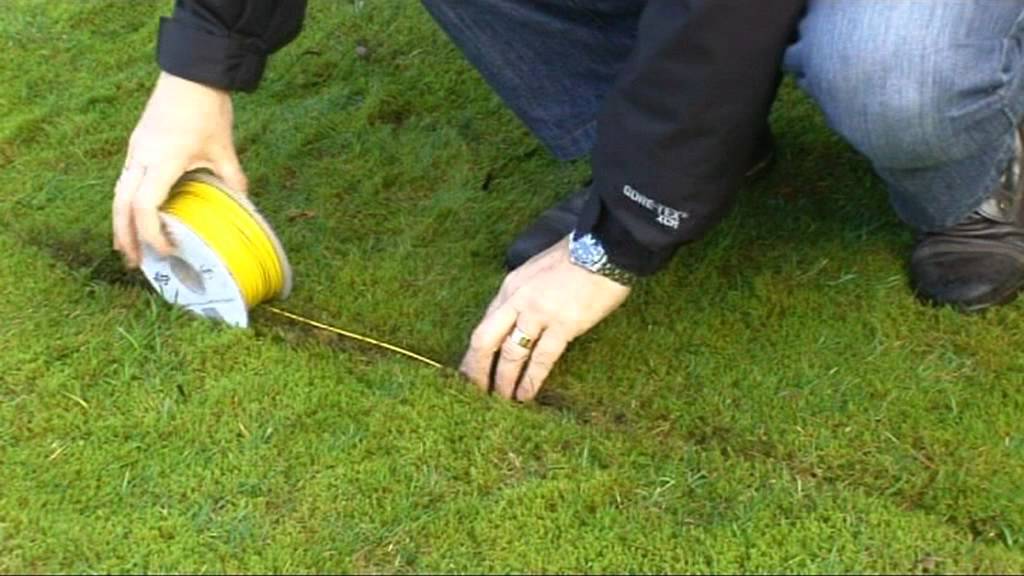
To prepare for the installation of an invisible dog fence, start by gathering all the necessary tools and equipment. These may include a shovel, measuring tape, flags, and a receiver collar for your dog. Make sure to mark the boundary area where you want the fence to be installed. Clear any debris or obstacles that may obstruct the path of the fence. This will ensure a smooth and efficient installation process. By following these steps, you will be well-prepared to install an invisible dog fence and provide a safe and secure space for your furry friend to roam.
Credit: www.youtube.com
Install The Invisible Dog Fence Wiring
Installing an invisible dog fence requires precise wiring to ensure the system functions properly. To begin, measure and cut the wire to the desired length, considering the area you want to enclose for your pet’s safety. Once the wire is ready, you have two options for positioning it: burying it or attaching it to existing fences. Burying the wire involves digging a trench along the boundary line and placing the wire inside, allowing for a discreet installation. Attaching the wire to existing fences is a suitable alternative if burying is not feasible. Utilize fasteners or zip ties to secure the wire to the fences, making sure it is taut and properly positioned.
Lastly, connecting the wire to the transmitter is crucial for the system to work effectively. Identify the transmitter’s location where it will be protected from the elements, and make sure it is easily accessible for future maintenance. Attach the wire to the transmitter following the manufacturer’s instructions, typically involving connecting specific wires or using wire connectors. By carefully completing these steps, you can install an invisible dog fence successfully, creating a safe and secure space for your beloved pet.
Set Up The Transmitter And Receiver Collar
|
Set Up the Transmitter and Receiver Collar To install an invisible dog fence, you first need to identify a suitable location for the transmitter. Choose a central spot in your home or garage where it can be easily accessed and protected from the elements. Next, connect the transmitter to a power source using the provided adapter. Ensure that it is securely plugged in and the power indicator light is on. After the transmitter is set up, it’s time to adjust the settings and test the signal strength. Refer to the manufacturer’s instructions to determine the appropriate signal distance for your desired boundaries. Use the provided testing tool to confirm the signal reaches the intended area. Once the transmitter is functioning properly, it’s time to properly fit and activate the receiver collar for your dog. Measure your dog’s neck and adjust the collar accordingly. Attach the collar to your dog and ensure it fits snugly but comfortably. Activate the collar and test it to make sure it is working correctly. |
Train Your Dog To Understand The System
To train your dog to understand the system of an invisible dog fence, it is important to introduce them to the boundaries gradually. Start by allowing your dog to explore the designated area while keeping a close eye on their behavior. Use visual and audio cues such as flags and a tone or beep from the fence collar to reinforce the limits. When your dog approaches the boundary, the collar should emit a mild static correction to deter them from crossing. It is crucial to monitor your dog’s behavior throughout the training process to ensure that they are understanding the boundaries and not experiencing any distress. With consistent training and positive reinforcement, your dog will learn to associate the Invisible Dog Fence with the boundaries and will stay within the designated area.
Troubleshooting And Maintenance Tips
When it comes to troubleshooting and maintaining your invisible dog fence, it’s important to address common issues that may arise. These can include signal disruptions or false alarms, which can often be resolved by checking the wire connections and ensuring they are secure. Additionally, regularly inspect the collar to make sure it’s functioning properly and replace the batteries as needed. Performing routine maintenance, such as inspecting the wire for any damage and repairing it if necessary, will help maintain the effectiveness of the dog fence.
If you find that your dog is not responding correctly to the invisible fence, it may be necessary to revisit the training process. Repeating the training sessions and reinforcing the boundaries can help your dog understand and respect the limitations of the invisible fence system. Consistency and patience are key during this process, and it’s important to monitor your dog’s progress to ensure they are safely contained within the invisible fence boundaries.
Frequently Asked Questions For How To Install An Invisible Dog Fence
Can You Install An Invisible Dog Fence By Yourself?
Yes, you can install an invisible dog fence by yourself. It’s a simple DIY process that doesn’t require professional assistance. Just follow the manufacturer’s instructions carefully for a successful installation. Make sure to select the right location and test the system before giving your furry friend the freedom to roam safely.
How Deep Does Invisible Fence Need To Be Buried?
The ideal depth for burying an invisible fence is around 1-3 inches.
Can A Dog Get Out Of An Invisible Fence?
Yes, a dog can get out of an invisible fence if they are determined enough or if the system is not working properly.
Conclusion
Installing an invisible dog fence is a simple and effective way to keep your furry friend safe and secure. By following the step-by-step instructions provided in this guide, you can ensure a successful installation process. Remember to carefully plan the layout and test the system before allowing your dog to roam freely.
With the right approach and some patience, you can provide your dog with the freedom to explore while maintaining their safety. Happy installing!