To install cable on a garage door, start by attaching the cable drum to the torsion shaft and securing it with set screws. Then, thread the cable through the brackets and pulley system, making sure it is properly aligned and tensioned.
Finally, attach the other end of the cable to the bottom bracket and adjust the tension as needed. Installing cable on a garage door is a necessary step to ensure proper functioning and safety. By following a few simple steps, you can successfully install the cable and keep your garage door in top condition.
This guide will outline the exact procedures you need to follow, providing you with a comprehensive understanding of the process. With clear instructions and attention to detail, you’ll be able to complete the cable installation efficiently and effectively.
Understanding The Importance Of Garage Door Cables
Understanding the importance of garage door cables is vital for every homeowner. Garage door cables play a crucial role in the smooth operation of the entire system. These cables assist in the lifting and lowering of the garage door, acting as a counterbalance to support the weight of the door.
Faulty or worn-out cables can lead to several common issues. One of the most common problems is a door that won’t open or close properly. This can be frustrating and inconvenient, especially if you rely on your garage for parking or storage. Additionally, faulty cables can cause the door to become unbalanced, resulting in misalignment and potential damage to the door and the track system.
To ensure the longevity and proper functioning of your garage door, it is important to regularly inspect and maintain the cables. Look for signs of wear, fraying, or rusting, and promptly replace any damaged cables. By understanding the importance of garage door cables and addressing any issues promptly, you can enjoy the convenience and security of a well-functioning garage door.
Tools And Materials You’ll Need
Tools and Materials You’ll Need
Essential tools necessary for cable installation:
| Tool | Purpose |
| Wrench | Tighten bolts and nuts |
| Socket set | Remove and install bolts and nuts |
| Pliers | Hold and maneuver cables |
| Vice grips | Secure cables in place |
| Wire cutters | Trim excess cable length |
| Tape measure | Measure cable length accurately |
| Level | Ensure proper alignment |
| Safety glasses | Protect eyes from debris |
| Screwdriver | Loosen and tighten screws |
| Step ladder | Reach high areas safely |
Required materials and their purpose:
- Cables: Provide the necessary tension and support for the garage door.
- Cable brackets: Secure the cables to the garage door and tracks.
- Fasteners (bolts, nuts, screws): Attach and secure various components.
- Replacement rollers: Ensure smooth operation of the garage door.
- Safety cable: Backup cable for added security and prevention of accidents.
- Strut: Reinforce the garage door panel to prevent bending and improve strength.
- Wire rope clips: Secure the cable ends together to prevent unraveling.
- Locking pliers: Hold cables in place while making adjustments.
Note: Before starting the cable installation, make sure to consult the manufacturer’s instructions for your specific garage door model.
Step 1: Preparations Before Installing The Cable
Step 1: Preparations Before Installing the Cable
Inspecting the garage door for any signs of damage is essential before the cable installation process. Look for any dents, cracks, or wear and tear on the door panels, hinges, and tracks. Ensure that the door is in good working condition to prevent any accidents or malfunctions.
Once the inspection is complete, it’s important to ensure all safety precautions are in place. This includes wearing protective gloves and eyewear, as well as having a sturdy ladder or scaffolding to reach the garage door safely. Additionally, ensure that the power to the garage door opener is disconnected to prevent any unintentional movement of the door during cable installation.
By taking these necessary preparations and safety precautions, you can ensure a smooth and secure cable installation on your garage door.
Step 2: Removing The Old Cable
Identifying the correct method for your type of garage door is crucial before you start removing the old cable. This step-by-step guide will help you safely remove the old cable from your garage door.
Step 1: Disable the automatic opener by unplugging it or turning off the power.
Step 2: Raise the garage door to the fully open position.
Step 3: Clamp locking pliers onto the track just below the bottom roller, preventing the door from sliding down.
Step 4: Remove the bottom bracket from each side of the door.
Step 5: Loosen the cable drum setscrews on both sides of the door using a wrench.
Step 6: Slide the cable off each drum and remove it carefully.
Step 7: Repeat the process to remove the cable from the other side of the door.
By following these steps, you will be able to remove the old cable from your garage door effectively and safely. Ensure that you handle each step with caution to prevent any damage or injury.
Step 3: Measuring And Cutting The New Cable
When installing a new cable for your garage door, it is essential to accurately measure and cut the cable to ensure proper functionality. To determine the appropriate length of the new cable, you should follow the correct technique. Start by measuring the distance between the bottom roller bracket and the cable drum. Take this measurement and add approximately 18 inches to allow enough cable for attachment and adjustment.
Once you have obtained the correct length of the cable, it is crucial to cut it properly without causing any damage. To cut the cable, use a quality cable cutter or a hacksaw with a fine-tooth blade. Securely hold the cable in place and make a clean, smooth cut through the wire strands.
By measuring and cutting the new cable accurately and using the correct technique, you can ensure a successful installation of your garage door cable. This will help maintain the smooth operation and longevity of your garage door system.
Step 4: Attaching The New Cable To The Garage Door
Step 4: Attaching the New Cable to the Garage Door Securely fastening the new cable to the drum or pulley system: To install cable on the garage door, the first step is to securely fasten the new cable to the drum or pulley system. Begin by unwinding the old cable from the drum, ensuring you have a firm grip on it. You can use a pair of pliers or a wrench to help with this process. Once the old cable is removed, take the new cable and thread it through the pulley or drum. Make sure the cable is properly aligned and tensioned. It is important to ensure that the cable is securely attached to avoid any accidents or damage to the door. Test the tension and alignment by manually opening and closing the door a few times. Adjust as necessary until the cable is properly tensioned and aligned. Remember, proper installation of the cable is crucial for the smooth and efficient operation of your garage door.Step 5: Attaching The Cable To The Bottom Bracket
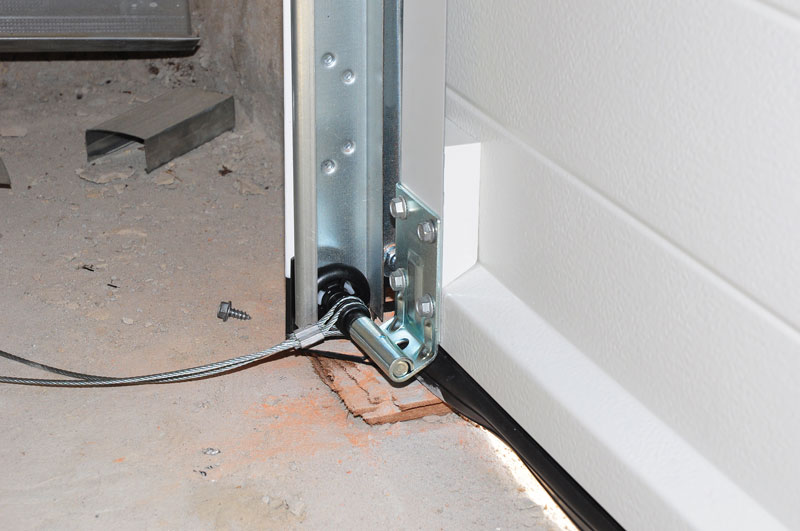
Step 5: Attaching the Cable to the Bottom Bracket
When installing the cable on your garage door, it is crucial to identify the correct attachment point for the cable. This ensures the cable is properly secured to the bottom bracket, resulting in optimal performance.
To identify the correct attachment point, start by locating the bottom bracket on your garage door. This is typically located near the center of the bottom panel. Once located, inspect the bracket for any existing holes or attachment points.
If there are no pre-existing attachment points, you will need to drill a hole in the bottom bracket. Be sure to consult the manufacturer’s instructions or a professional for guidance on the appropriate size and placement of the hole.
Once the attachment point is identified or created, thread the cable through the hole and securely fasten it to the bottom bracket using a provided screw or other fastening method.
Repeat this process for each cable that needs to be attached to the bottom bracket. Ensure that the cables are properly tensioned for the correct operation of your garage door.
By properly attaching the cable to the bottom bracket, you can ensure optimal performance and longevity of your garage door system.
Credit: ponderosagaragedoors.com
Step 6: Testing And Adjusting The Cable
|
After installing the cable on your garage door, it is essential to test and adjust it to ensure smooth movement and proper balance. Start by manually operating the door to verify its smoothness. Observe if there are any jerks or sticking points that could indicate tension issues. If you notice any imbalance, you may need to adjust the tension of the cable. This can be done by adjusting the cable drum on each side of the door. First, release the tension on the cable by pulling the emergency release handle. Then, using a wrench, loosen the set screws on the cable drum. Rotate the drum to adjust the tension, making small increments in either direction until the door is balanced. Remember to test the door’s movement after each adjustment to ensure optimal performance. Once you are satisfied with the smoothness and balance, tighten the set screws securely to prevent any slipping or unexpected changes in tension. |
Frequently Asked Questions On How To Install Cable On Garage Door
How Do I Get The Cable Back On My Garage Door?
To get the cable back on your garage door, follow these steps: 1. Disconnect the power to the door opener. 2. Locate the cable drum and unwind it until there is enough slack. 3. Line up and thread the cable back into the pulley system.
4. Turn the cable drum to tension the cable. 5. Reconnect the power and test the door to ensure it’s working properly.
How Much Does It Cost To Replace A Cable On A Garage Door?
The cost to replace a garage door cable can range between $100 to $200, depending on factors such as the type of cable and labor fees. Professional installation is recommended for safety and proper functionality.
How Do You Tension A Garage Door Cable?
To tension a garage door cable, follow these steps: Disengage the opener, secure the door, locate the adjustment nuts, tighten or loosen the nuts to achieve proper tension, re-engage the opener, and test the door for smooth operation.
Conclusion
Installing cable on a garage door is a crucial task that requires precision and attention to detail. By carefully following the steps outlined in this guide, you can ensure the smooth and efficient functioning of your garage door. Remember to prioritize safety, and don’t hesitate to seek professional help if needed.
With the right knowledge and tools, you can successfully install cable on your garage door and enjoy its reliable performance for years to come.