To install a belt drive garage door opener, follow these steps. A belt drive garage door opener can provide a smooth, quiet operation for your garage door.
If you’re looking to install one, the process can be straightforward if you follow these steps. In this guide, we will take you through the step-by-step process of installing a belt drive garage door opener, from assembling the necessary tools to connecting all the components securely.
By the end of this guide, you will have the knowledge required to successfully install a belt drive garage door opener and improve the functionality of your garage. So, let’s get started with the installation process.
Credit: overheadtampa.com
Choosing The Right Garage Door Opener
When installing a belt drive garage door opener, it is crucial to choose the right opener for your garage door. Consider the weight and size of your garage door to ensure compatibility and efficient operation. Analyze the noise levels produced by different models to find one that suits your needs.
Gathering The Necessary Tools And Materials
In order to install a belt drive garage door opener, you will need to gather the necessary tools and materials. These include a belt drive garage door opener kit, a power drill and drill bits, a screwdriver set, a measuring tape, a ladder, and a socket set. Having these tools readily available will make the installation process much easier and efficient. The power drill and drill bits will be used to make holes for mounting the opener and attaching the necessary hardware. The screwdriver set will come in handy for tightening screws and securing components. Measuring tape will help ensure accurate placement and alignment of the opener. A ladder will provide access to the garage door mechanism, allowing for easy installation. Finally, a socket set will be used to fasten nuts and bolts securely. By having all of these tools on hand, you can successfully install a belt drive garage door opener.Preparing The Garage Door Opener Unit
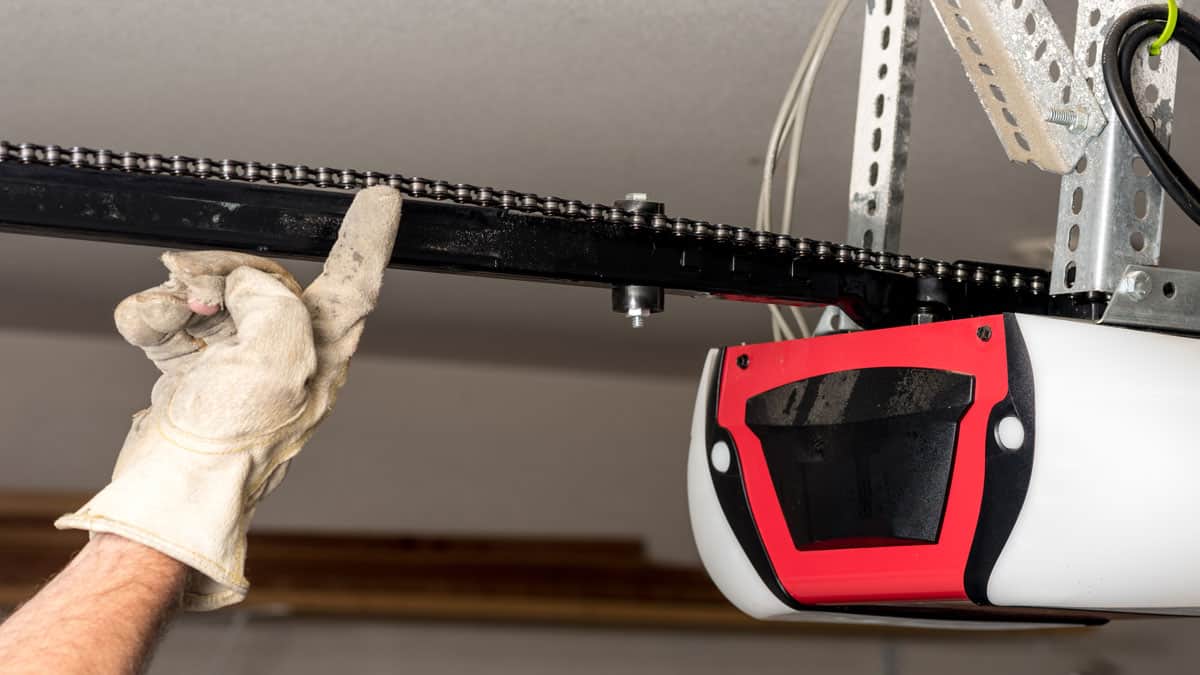
Assembling the belt drive system components is the first step in installing a belt drive garage door opener. This involves attaching the belt to the trolley and connecting it to the motor unit. Make sure to follow the manufacturer’s instructions carefully to ensure proper installation.
Once the components are assembled, it’s time to mount the motor unit securely to the ceiling. This is an important step as it ensures stability and prevents any unnecessary movement during operation. Use strong brackets and screws to securely attach the motor unit, making sure it is level and aligned with the center of the garage door.
After mounting the motor unit, it’s necessary to adjust the travel and force limits. These settings determine how far the garage door opens and closes and the amount of force it requires to operate. Follow the manufacturer’s instructions to set the limits correctly, ensuring smooth and safe door movement.
Installing The Rail And Belt Assembly
When installing a belt drive garage door opener, one of the first steps is positioning the rail along the length of the garage ceiling. It’s important to ensure that the rail is aligned properly and centered in the opening. Once the rail is in position, secure the rail brackets at even intervals and make sure they are securely fastened.
Next, connect the rail segments together using the provided hardware. It’s crucial to follow the manufacturer’s instructions and use the specified hardware for optimal performance. Once the rail segments are connected, attach the belt to the trolley and secure it tightly. The belt should be properly aligned and not twisted or tangled.
Installing a belt drive garage door opener requires attention to detail and following the provided instructions. Take the time to position the rail accurately, secure it with brackets, and connect the rail segments properly. Finally, make sure the belt is securely attached to the trolley. By following these steps, you can successfully install a belt drive garage door opener in your garage.
Mounting The Wall Control Panel And Safety Sensors
Choosing the optimal location for the wall control panel: When installing a belt drive garage door opener, it is crucial to select the right spot for the wall control panel. Look for a location that allows easy access and visibility. It should be relatively close to the garage door, but not obstructed by it. Consider installing it at a height that is convenient for everyone in the household, ensuring accessibility for both adults and children.
Wiring the wall control panel to the motor unit: Properly wiring the wall control panel is essential for the garage door opener to function effectively. Follow the manufacturer’s instructions to ensure the correct connection. Make sure to turn off the power supply before starting the installation process. Take note of the color-coded wires and match them accordingly. Securely tighten all wire connections to prevent any loose connections or potential electrical hazards.
Aligning and installing the safety sensors on both sides of the garage door: Safety sensors play a crucial role in preventing accidents and ensuring smooth operation of the garage door opener. Carefully align the sensors on either side of the door, ensuring they are facing each other and at the correct height. Use the necessary brackets and mounting hardware provided by the manufacturer. Once installed, test the sensors by safely closing and reopening the garage door to ensure they are working correctly.
Wiring The Garage Door Opener
In order to wire your belt drive garage door opener, you will need to run the power cord to a nearby electrical outlet. Start by locating a power source that is within reach of your opener’s motor unit. Measure and cut the power cord to the appropriate length, leaving enough slack for easy installation. Strip the wires at the end of the power cord and connect them to the corresponding terminals on the motor unit, ensuring a secure and tight connection. Once the power cord is successfully connected, it is important to test the correct functioning of the wall control and safety sensors. Press the buttons on the wall control to open and close the garage door, and ensure that the safety sensors are detecting obstacles in the door’s path and stopping the door from closing if something is detected. If everything is functioning properly, your belt drive garage door opener is ready to be used.
Testing And Adjusting The Garage Door Opener
Testing and adjusting your garage door opener is an essential step in the installation process. After installing the belt drive garage door opener, it is important to activate it to test its functionality. This can be done by using the remote control or wall-mounted button. Activate the opener several times to ensure it operates smoothly and without any issues.
Next, you need to adjust the open and close travel limits of the garage door opener. The travel limits determine how far the door will open and close. If the door does not open or close fully, you may need to adjust the travel limits to ensure proper operation. Consult the manufacturer’s instructions for the specific steps to adjust the travel limits.
Additionally, it is important to check the door balance and make any necessary adjustments. A balanced door is essential for smooth operation of the opener and to prevent wear and tear. Use a level to check the balance of the door and adjust the tension or spring as needed.
Regular Maintenance Tasks
Regular maintenance tasks for a belt drive garage door opener are essential for its smooth operation and longevity. Lubricating the belt and moving parts helps prevent friction and keeps the system running smoothly. It is important to regularly check for loose or damaged components, such as loose bolts or worn-out belts, as these can affect the overall performance of the opener. Testing the battery backup system, if applicable, ensures that it is functioning properly in case of a power outage. By staying proactive and performing these maintenance tasks regularly, you can ensure that your belt drive garage door opener operates efficiently and reliably for years to come.
Troubleshooting Common Issues
In order to troubleshoot common issues with your belt drive garage door opener, you need to first identify and resolve any connectivity problems. If you are experiencing difficulties with the remote controls or keypad entry, try replacing the batteries or reprogramming the devices. This often solves the problem and allows for smooth operation of your garage door opener.
Another common issue with belt drive garage door openers is noisy or vibrating operation. This can be caused by loose hardware or worn-out components. Check all the nuts and bolts, and tighten them if necessary. Additionally, inspect the belt for any signs of wear or damage. If the belt needs to be replaced, be sure to choose a high-quality replacement.
| Issue: Connectivity problems | Solution: Replace batteries or reprogram remote controls/keypad entry devices |
| Issue: Noisy or vibrating operation | Solution: Check and tighten all nuts and bolts; inspect and replace worn-out belt |
Seeking Professional Help
Seeking professional help for installing a belt drive garage door opener can be beneficial in certain situations. Recognizing when to ask for professional assistance is crucial. For example, if you encounter complex wiring issues or difficulty understanding the installation instructions, it’s wise to contact a reputable garage door opener technician. They have the expertise to troubleshoot problems and ensure a safe installation.
Another consideration is warranty coverage and maintenance contracts. Professional installation often comes with a warranty, giving you peace of mind if any issues arise. Additionally, some manufacturers require professional installation to maintain warranty coverage. Opting for professional help not only ensures a smooth installation process but also demonstrates a commitment to maintaining the longevity and functionality of your garage door opener.
Frequently Asked Questions For How To Install Belt Drive Garage Door Opener
Can I Convert My Garage Door Opener To Belt Drive?
Yes, you can convert your garage door opener to a belt drive. This is a feasible option that many homeowners choose for smoother and quieter operation. Belt drives offer less vibration and are generally more reliable than traditional chain drives.
What Is Better For A Garage Door Opener Belt Drive Or Screw Drive?
The better option for a garage door opener is a belt drive. It is quieter, smoother, and requires less maintenance compared to a screw drive.
Which Is Easier To Install A Belt Drive Or Chain Drive Garage Door Opener?
Installing a belt drive garage door opener is easier than installing a chain drive opener. Belt drive openers require less maintenance, are quieter, and have smoother operation. They are also easier to adjust and don’t require lubrication like chain drive openers.
Conclusion
Installing a belt drive garage door opener is a simple and effective way to upgrade your garage. With easy-to-follow steps and a few basic tools, you can improve the security and convenience of your garage. By following this guide, you now have the knowledge and confidence to tackle this DIY project.
Don’t wait any longer – get started today and enjoy the benefits of a smooth and quiet garage door opener.