Installing wire fence with T posts is a simple process that involves driving the posts into the ground at regular intervals, unrolling the wire along the fence line, and securing it to the posts using wire clips or zip ties.
Credit: blog.redbrand.com
Choosing The Right Tools And Materials
When installing a wire fence with T-posts, the first step is to select the appropriate wire fence type. This will depend on the specific needs of your project, whether it’s for containing animals or enhancing security. Once you have chosen the right type of wire fence, you need to determine the required number of T-posts and wire length. This can be calculated based on the length of the fence line and the spacing between posts.
After figuring out the necessary materials, gather the necessary tools to make the installation process easier. Some essential tools include pliers, wire cutters, and a post driver. These tools will help you fasten the wire to the T-posts securely. It is important to have these tools on hand before starting the installation process.
Marking The Fence Line
Measuring and marking the desired fence perimeter is the first step in installing a wire fence with T posts. To ensure a proper installation, it is crucial to accurately mark the area where the fence will be placed.
Start by determining the boundaries of your fence line. Use a measuring tape to measure the desired length and width, and mark these measurements with stakes. Ensure proper placement of corners and gates, as they will dictate the layout of the fence.
To create a straight guideline, use stakes and string. Drive stakes into the ground along the marked points and attach a string tightly between them. This will act as a guide for placing the T posts in a straight line.
Note: It is important to double-check your measurements and adjust the stakes and string as needed to ensure accuracy before proceeding with the installation.
Digging T-post Holes
How to Install Wire Fence With T PostsDetermining the spacing between T-posts is an important step in installing a wire fence with T posts. It is recommended to space the posts approximately 8 to 10 feet apart, depending on the type of fence and the terrain. When digging the holes, using a post hole digger or auger can make the process easier and more efficient. These tools allow for quicker hole creation, especially in dense or rocky soil. When using the post hole digger or auger, make sure to keep consistent depth and alignment of the holes to ensure a straight and sturdy fence. By maintaining a consistent depth, the fence will be properly supported and secure.
Setting T-posts In The Ground
To install a wire fence with T-posts, start by setting the T-posts in the ground. This process involves inserting and aligning T-posts in the holes that have been dug. Ensure that the T-posts are properly aligned and at the desired height above the ground. Tamping the soil firmly around the T-posts is also crucial to provide stability and ensure that they stay in place. Taking these steps will help you create a sturdy and effective wire fence.
Securing T-posts With Concrete (optional)
To install a wire fence with T posts, you may want to consider securing the posts with concrete for added stability. Assessing the need for additional stability is important before proceeding with the concrete. If you are installing a heavy-duty fence or if you live in an area with strong winds or loose soil, using concrete can help prevent the T posts from shifting or leaning over time. To prepare the concrete mixture, you will need to gather the necessary materials such as cement, sand, and water. Once you have your concrete mixture ready, you can start pouring it around the T post base. This will help provide extra strength and ensure that the posts remain firmly in place. By taking these steps, you can install a wire fence that is sturdy and durable.
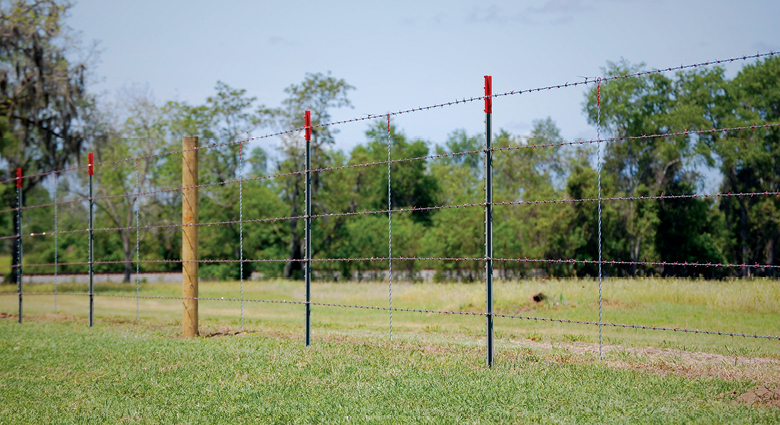
Stretching Wire Between T-posts
When installing a wire fence with T-posts, it is essential to properly stretch the wire between the posts to ensure a secure and functional fence. Starting at one end, attach the wire to the corner post securely using appropriate staples or clips. Using tensioners, apply pressure evenly along the fence line to tighten the wire. This will help prevent sagging and maintain the fence’s integrity over time. Proper tension ensures that the wire is securely held in place, without any loose or weak spots. Tensioners are vital for achieving the desired tightness of the wire and should be evenly distributed at regular intervals. Regularly inspect the fence line and adjust the tension as needed to keep it taut. By following these steps, you can successfully install a wire fence with T-posts that is sturdy and reliable.
Attaching Wire To T-posts
Attaching wire to T-posts is a crucial step in the installation process. To secure the wire, you have two options: using clips or wire ties. Clips provide a more sturdy and permanent attachment, while wire ties are easier to install and remove if necessary. Whichever method you choose, make sure to space the wire attachments evenly along the T-posts to ensure proper tension and stability. This will prevent sagging or loosening of the wire over time. Additionally, it is important to cut any excess wire and bend the ends to eliminate sharp edges that could pose a safety hazard. By following these steps, you can ensure a successful installation of wire fence with T-posts.
Installing Gates In Your Wire Fence
Installing gates in your wire fence is an essential step to creating a functional and secure enclosure. When choosing a suitable gate type for your needs, consider factors such as the size of your animals, the level of security required, and the aesthetics you desire. Common gate types include single swing gates, double swing gates, and sliding gates.
To install gate posts, start by positioning the gate where you want it to be and mark the locations for the gate posts. Dig holes at these marked spots and insert the gate posts, ensuring they are level and secure. Next, attach the gate hardware, such as hinges and latches, to the gate posts. This will allow the gates to swing or slide open and closed smoothly.
Once the gate posts are in place and the hardware is attached, it’s time to attach the wire to create functional gates. Use strong wire, such as galvanized steel, and attach it securely to the gate frame, making sure there are no gaps or loose ends. This will prevent animals from escaping and ensure the fence is sturdy.
Regular Inspection And Maintenance
Regular inspection and maintenance are key to ensuring the longevity and effectiveness of your wire fence with T posts installation. Monitor the fence regularly for any loose or broken wires and posts, as these can compromise the integrity of the fence. Look out for signs of wear and damage, such as rust or bent wires, and address them promptly to prevent further issues.
Perform necessary repairs as soon as you notice any problems. This may involve tightening loose wires or replacing broken ones. It is important to maintain the fence’s structural strength and stability to prevent animals from escaping or intruders gaining access.
By conducting regular inspections and prompt maintenance, you can ensure that your wire fence with T posts remains strong and functional, providing security and peace of mind for years to come.
Excluding Wildlife With Additional Measures
html Blog post title Heading Subheading and contentInstalling additional barriers to keep out specific animals:
Table presenting info| Animal | Additional Barrier |
|---|---|
| Rabbits | Wire mesh fence with small openings |
| Deer | Adding electric wire at a height of 30 inches |
| Squirrels | Implementing wildlife deterrents like motion-activated devices |
Adding electric wire or mesh fence around your yard can provide enhanced protection against wildlife. For rabbits, consider using a wire mesh fence with small openings to prevent them from squeezing through. To keep deer out, install electric wire at a height of 30 inches, which can act as a deterrent. Additionally, implementing wildlife deterrence strategies along the fence line, such as motion-activated devices, can help keep squirrels away. These measures will ensure that your wire fence with T posts effectively excludes wildlife and provides a secure enclosure for your property.
Frequently Asked Questions On How To Install Wire Fence With T Posts
How Do You Attach A Wire Fence To A T Post?
To attach a wire fence to a T post: Unroll the wire along the T post, leave excess, and start at the bottom. Use fence clips to secure the wire to the post. Space the clips every 2-4 feet. Wrap the wire around the post and secure with additional clips.
Trim any excess wire.
What Is The Spacing For T Posts For Wire Fence?
The spacing for T posts for wire fence varies depending on the type of fence you are installing. Generally, T posts are spaced 8 to 12 feet apart for a wire fence. However, it is best to refer to the specific instructions provided by the manufacturer for your particular wire fence.
Which Side Of T Post Does Wire Go On?
The wire goes on one side of the T post.
How Tall Should A T Post Be For A 5 Foot Fence?
The T post for a 5-foot fence should be approximately 6 feet tall.
Conclusion
To wrap it up, installing a wire fence with T posts can be a straightforward process that requires some planning and attention to detail. By following the step-by-step instructions outlined in this guide, you can create a sturdy and reliable fence for your property.
Remember to assess your needs, select the right materials, and install the T posts properly. Whether you are looking to secure livestock, protect your garden, or define your property boundaries, this method is both cost-effective and efficient. Start your fencing project today and enjoy the benefits for years to come.