To install a post on concrete, first, mark the desired location on the concrete surface. Then, drill holes into the concrete using a masonry drill bit, insert anchor bolts or concrete screws into the holes, and tighten them securely to attach the post to the concrete.
Installing a post on concrete can be a straightforward process when done correctly. Whether you need to secure a fence post, mailbox, or other outdoor structure, ensuring its stability is essential. We will provide you with a step-by-step guide on how to install a post on concrete.
By following these instructions, you can confidently complete the installation and ensure that your post remains firmly in place. So let’s get started with the process of installing a post on concrete.
Gathering The Necessary Tools And Materials
A successful installation of a post on concrete requires the gathering of the necessary tools and materials. To ensure smooth installation, here is a list of tools and materials you will need:
| Tools | Materials |
| – Tape measure | – Concrete post |
| – Level | – Post bracket |
| – Drill | – Concrete screws |
| – Hammer | – Gravel or concrete mix |
| – Screwdriver | – Water |
| – Wrench | – Shovel |
When it comes to selecting the appropriate post, it is important to consider the type of installation and the weight it needs to support. For lighter projects, a wooden or PVC post can be suitable, while for heavier-duty applications, steel or concrete posts are recommended. Moreover, you must ensure that the post bracket matches the size and shape of your post, and that you have the necessary screws to secure it. Additionally, for stability, adding some gravel or concrete mix at the bottom of the hole can be helpful. With the right tools and materials, you can install a post on concrete securely and efficiently.
Assessing The Site
Assessing the Site
Before installing a post on concrete, it is crucial to examine the concrete surface for suitability. Start by carefully inspecting the area where the post is intended to be placed. Check for any cracks, chips, or unevenness in the concrete. These imperfections can impact the stability and durability of the installation.
Determining the location for installing the post
Once the concrete surface is deemed suitable, the next step is to determine the precise location for installing the post. Consider the purpose of the post and its intended function. Whether it’s a fence, sign, or structural support, the placement should be strategic.
Taking proper measurements for accurate installation
Accurate measurements are vital to ensure a proper and secure installation. Use a tape measure to determine the desired height and depth of the post. Make sure to account for any additional features, such as post bases or brackets, in the measurements. Taking meticulous measurements will help to avoid any issues during the installation process.
Marking The Position
Marking the Position
To install a post on concrete, it is crucial to identify the exact spot where it will be placed.
One method to mark the position is by using chalk or marker. By applying a chalkline or marking directly with a marker, you can create clear visibility for the placement.
Ensure that you measure the distance accurately and align it with the necessary specifications for your project. This will help you determine the proper placement of the post.
Once you have marked the position, double-check the accuracy before proceeding with the installation process. It is essential to maintain precision to ensure a successful and secure installation.
Drilling Holes In The Concrete
When installing a post on concrete, drilling holes in the concrete is an important step to achieve stability. The right type of drill bit is crucial for the job. Concrete drill bits are designed specifically for drilling through concrete and are available in various sizes. It is essential to choose a drill bit that matches the diameter of the post you are installing.
Proper drilling technique is also vital to avoid any damage. Start by marking the position of the hole on the concrete surface. Wearing safety goggles and using a hammer drill, apply steady pressure while drilling at a slow speed. As you drill, periodically remove the bit to clear away debris. This will help prevent overheating and ensure a clean hole.
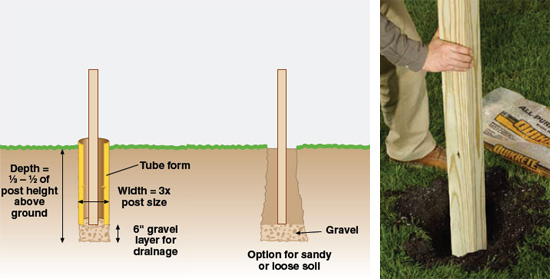
Ensuring the hole depth is sufficient for stability is crucial. The hole depth should be at least one-third the length of the post being installed. This will provide ample support and prevent any wobbling. Using a depth gauge or marking the drill bit with tape can help you measure the depth accurately.
Inserting Anchor Or Sleeve
When installing a post on concrete, it is crucial to select the appropriate anchor or sleeve type. The anchor or sleeve will provide stability and ensure the post stays in place. There are various options available, including wedge anchors, concrete screws, and adhesive anchors. It is important to consider the weight and load-bearing requirements of the post when selecting the anchor or sleeve.
Once the anchor or sleeve type has been chosen, the next step is to insert it into the hole. Carefully place the anchor or sleeve into the pre-drilled hole, ensuring it is flush with the surface of the concrete. Use a hammer to gently tap it in if necessary.
After inserting the anchor or sleeve, the final step is to secure it in place. This can be done by tightening the nut on a wedge anchor or using a wrench to tighten the screws on a concrete screw anchor. Adhesive anchors typically require a curing time before they can be fully secured.
Attaching The Post To The Anchor Or Sleeve
When installing a post on concrete, it’s crucial to securely attach it to an anchor or sleeve. Begin by positioning the post directly over the anchor or sleeve, making sure it aligns perfectly. Ensuring a proper alignment is essential for a secure installation. Once aligned, it’s time to fasten the post securely. Use appropriate tools such as screws or bolts to firmly attach the post to the anchor or sleeve. This ensures stability and longevity for the post. Make sure to tighten the fasteners adequately, ensuring that they are snug and won’t come loose over time. By following these steps, you can successfully install a post on concrete, providing a solid foundation for various structures and fences.
Checking Stability And Alignment
After installing a post on concrete, it is crucial to check its stability and alignment to ensure it will withstand the test of time. Evaluating the stability of the installed post is essential in determining its ability to withstand external forces that may cause it to move or even collapse. To assess stability, you can apply pressure from different angles to see if the post remains firmly in place, confirming its solidity. If any instability is detected, adjustments need to be made to enhance the post’s stability.
Aside from stability, the alignment of the installed post is also important for both aesthetic and functional purposes. A properly aligned post enhances the overall appearance of the structure and ensures that it functions as intended. If necessary, adjustments can be made by adjusting the position of the post until it aligns perfectly with the desired orientation.
Adding Finishing Coverings
When installing a post on concrete, adding finishing coverings is an important step to enhance the overall appearance. Concealing the base of the post with a decorative covering not only adds a touch of style but also helps protect the post from weather conditions and potential damage.
Choosing suitable materials for aesthetic purposes is crucial. Options such as stone veneers, brick pavers, or even wooden wraps can be used to create an appealing look that matches the surrounding landscape or architectural style. Consider the durability, maintenance requirements, and compatibility with the existing design when selecting the covering material.
By carefully selecting and installing a decorative covering, you can transform a plain concrete post into a visually pleasing element that blends seamlessly with its surroundings. Whether it’s a fence post, a mailbox post, or a structural support post, adding a finishing covering elevates the overall appearance and contributes to the overall aesthetic appeal of your outdoor space.
Applying Protective Coating
When installing a post on concrete, applying a protective coating is essential to protect the post from weathering and corrosion.
To select the appropriate coating for the post material, consider factors such as the type of metal or wood used and the specific environmental conditions it will be exposed to. Conduct thorough research or consult with a professional to determine the most suitable coating.
Once the coating is chosen, proper application techniques are crucial for optimum durability. Follow the manufacturer’s instructions carefully and ensure the surface is clean and dry before applying the coating. Use a brush, roller, or spray method, depending on the specific coating and desired finish.
Remember to apply multiple coats if recommended by the manufacturer and allow sufficient drying time between coats. Regularly maintain and inspect the coated surface to identify any signs of wear or damage and promptly address them to prolong the lifespan of the post.
Regular Maintenance And Inspection
If you want to ensure the longevity of your posts installed on concrete, regular maintenance and inspection is crucial. Periodically inspect the post for any signs of damage or shifting. Look for cracks, chips, or any other visible issues that could compromise the post’s integrity. If you notice any damage, it’s important to repair or reinforce the post as needed. This might involve filling in cracks or applying extra support to prevent further damage. Taking preventative measures can also help prolong the lifespan of the installation. One way to do this is by applying a protective coating to the post, which can help safeguard against moisture and other potential sources of damage. Regularly clean the post to remove any dirt or debris that could lead to deterioration over time. By following these maintenance and inspection guidelines, you can ensure that your posts remain sturdy and secure for years to come.
Credit: www.quikrete.com
Frequently Asked Questions On How To Install Post On Concrete
How Do You Attach A Post To Concrete?
To attach a post to concrete, follow these steps: 1. Position the post where you want it, ensuring it’s level. 2. Mark the holes for drilling. 3. Drill the holes using a masonry drill bit. 4. Insert anchors into the holes.
5. Attach the post to the anchors using screws or bolts.
How Do You Attach A Post To Uneven Concrete?
To attach a post to uneven concrete, follow these steps: 1. Use a hammer drill to create holes in the concrete. 2. Insert concrete anchors into the holes. 3. Align the post with the anchors and secure it with screws.
4. Use a level to ensure the post is straight. 5. Finally, tighten the screws to secure the post in place.
Is 2 Feet Deep Enough For Fence Posts?
Yes, 2 feet is deep enough for fence posts. It provides sufficient stability and support for most fences.
How Do You Put A 6×6 Post In The Ground?
To put a 6×6 post in the ground, dig a hole that’s deep enough to secure the entire post. Make sure the hole is wider than the post and use a level to ensure it’s straight. Then, fill the hole with concrete and let it set before attaching any brackets or structures.
Conclusion
Installing posts on concrete can be a simple and effective process with the right tools and techniques. By ensuring proper preparation, selecting the appropriate type of post, and using the correct installation method, you can achieve a secure and durable structure.
Remember to follow safety precautions and consult with professionals if needed to ensure a successful project. So go ahead and get started on your next outdoor project without any hesitation!