To install a wood fence panel, start by preparing the area and measuring the space where the fence will be installed. Then, dig post holes, set the posts, and attach the fence panels to them.
Wood fence panels can enhance the esthetics and privacy of your property while providing a secure boundary for pets and children. Installing a wood fence panel involves several steps that ensure a sturdy and long-lasting structure. Before you begin, it’s crucial to plan the layout and obtain the necessary permits, if required.
Proper preparation includes measuring the space, determining the location of the posts, and gathering the necessary tools and materials. By following the right steps, you can easily install a wood fence panel and enhance your outdoor space.
Materials Needed
To install a wood fence panel, you will need the following materials:
| Wood fence panels | Concrete mix | Gravel |
| Nails | Screws | Hammer |
| Screwdriver | Level | Measuring tape |
You will need wood fence panels to create the main structure of the fence. Concrete mix is necessary to secure the posts in the ground, ensuring stability. Gravel can be used as a base for the fence posts. Nails and screws will be needed to attach the wood fence panels and secure them firmly. A hammer and screwdriver are essential tools for driving nails and screws into the wood. The level will help ensure that the fence panels are straight and even, while the measuring tape will be used to measure the appropriate spacing between the panels. Having all these materials ready will make the installation process easier and more efficient.
Step 1: Planning And Preparation
Determining the fence panel layout and measurements is the first step to installing a wood fence panel. Take accurate measurements of the area where you want to install the fence to determine the number of panels you’ll need. It’s important to check local regulations and obtain any required permits before proceeding with the installation.
Gather all the necessary materials and tools for the project. You’ll need wood fence panels, posts, gravel, concrete, a level, a tape measure, a post hole digger, a circular saw, and a hammer. Make sure you have everything ready before starting the installation to avoid unnecessary delays.
Once you have the layout planned and all the materials and tools in place, you’re ready to move on to the next step in installing your wood fence panel.
Step 2: Marking The Fence Line
To mark the fence line for installing a wood fence panel, use stakes and string. Carefully align the string with the property boundaries to ensure a straight line. This will help maintain the neatness and accuracy of the fence installation. Additionally, mark the specific locations where the fence posts will be installed along the line. This step is crucial as it will guide you during the installation process and help keep the fence panels evenly spaced. Taking the time to accurately mark the fence line will ultimately contribute to a successful and professional-looking wood fence panel installation.
Step 3: Installing The Fence Posts
Step 3: Installing the Fence Posts
Dig holes for the fence posts and ensure they are deep enough to provide stability. Add gravel at the bottom of each hole for proper drainage, as this helps prevent the posts from rotting over time. Insert the posts into the holes and use a level to ensure they are straight and aligned with each other. Once the posts are in position, secure them by pouring concrete mix into the holes, making sure it fully surrounds the base of each post. Use a level again to double-check that the posts are still straight before the concrete sets. Allow the concrete to dry and harden according to the instructions on the package.
Step 4: Attaching The Fence Panels
- Begin by aligning the first wood fence panel with the first fence post.
- Use nails or screws to securely attach the panel to the post.
- Make sure the panel is leveled properly to ensure a straight fence.
- Repeat this process for each subsequent fence panel, working your way from one end to the other.
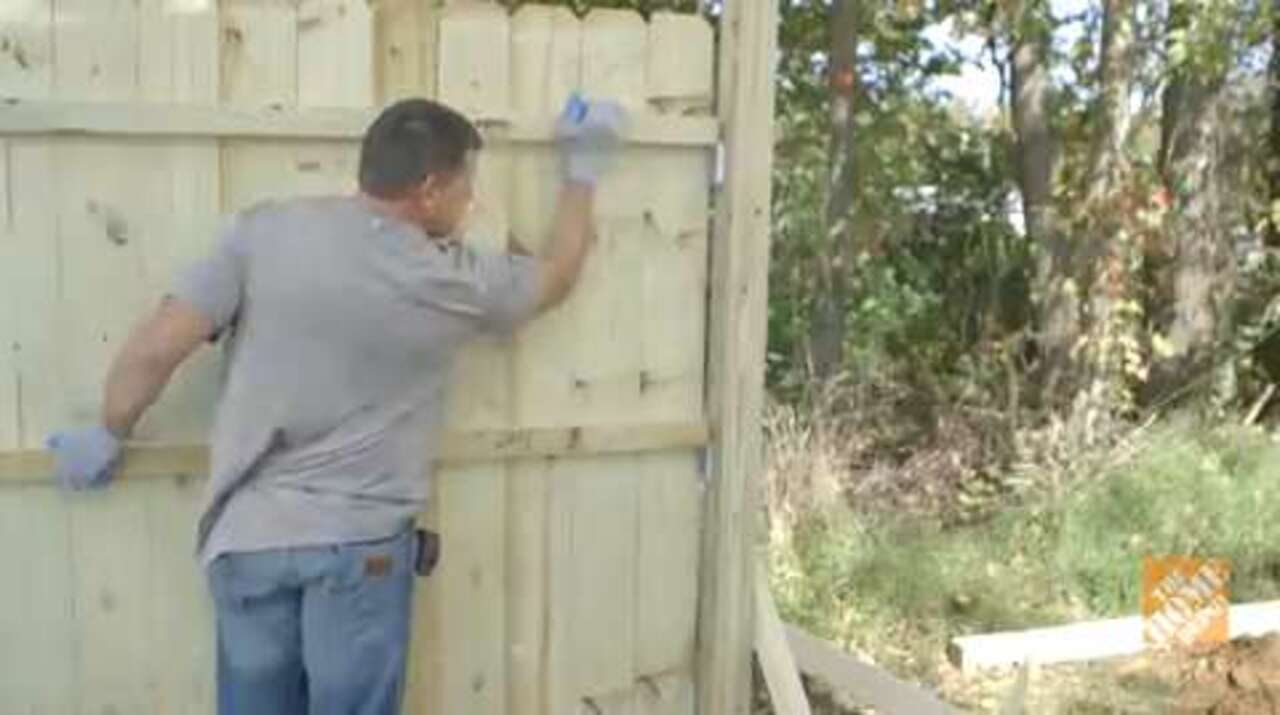
Credit: videos.homedepot.com
Step 5: Finishing The Fence
If your wood fence panel is slightly longer than needed, trim any excess length using a saw or other cutting tool. Ensure that the panel fits perfectly within the designated space.
Next, secure the panels together using screws or nails. Make sure to fasten the panels firmly to each other to enhance stability and prevent any gaps between them.
Once the fence panels are securely attached, you can add any additional features such as gates or decorative elements. These additions can enhance the aesthetics and functionality of your wood fence.
If you wish to protect the wood from weathering, you can apply a protective finish or paint to the panels. This helps to preserve the wood and maintain its appearance for a longer period of time.
Step 6: Maintenance Tips
Regularly inspect the fence for damage or loose components. This will help you identify any signs of wear or weakness that should be addressed promptly. Treat the wood panels as recommended by the manufacturer to prevent rot or decay. Applying a protective coating or sealant can also help maintain the appearance and integrity of the fence. Keep the fence clean and clear of debris to prevent any buildup of dirt or leaves that could cause moisture retention and potential damage. Finally, make any necessary repairs promptly to prolong the fence’s lifespan. Replacing any broken or damaged panels, tightening loose screws or nails, and reinforcing weak areas will help ensure the fence remains sturdy and functional for years to come.
Frequently Asked Questions Of How To Install A Wood Fence Panel
How Do You Install Wooden Fencing Panels?
To install wooden fencing panels, follow these steps: 1. Measure and mark the desired locations for the panels. 2. Dig holes for the fence posts using a post hole digger. 3. Place the posts in the holes and secure them with concrete.
4. Attach the panels to the posts using screws or nails. 5. Finish by adding any necessary gates or finishing touches.
How Do You Attach Wood Fence Panels To Posts?
Attach wood fence panels to posts by following these steps: 1. Align the panel with the posts. 2. Use screws or nails to secure the panel to the posts. 3. Ensure the panel is level and plumb. 4. Repeat for all panels, leaving space for expansion.
5. Use additional support, such as brackets, if needed.
Do You Nail Or Screw A Wood Fence?
Nail the wood fence to secure it tightly. Screws can also be used, offering added strength and durability. Choose the method that best suits your needs and preferences.
Can You Install Fence Panels Yourself?
Yes, you can install fence panels yourself. It’s a DIY project that requires some planning and tools. Start by measuring and marking the installation area, then dig holes for the posts. Set the posts in concrete, attach the panels, and secure them with screws or nails.
Conclusion
To sum up, installing a wood fence panel is a manageable task that can enhance the security and aesthetics of your property. By following the step-by-step instructions outlined in this guide, you can confidently undertake this project yourself. Remember to gather the necessary tools and materials, measure accurately, and maintain regular upkeep to ensure the longevity of your fence.
Don’t hesitate to seek professional assistance if needed. Enjoy the privacy and beauty your new wood fence will provide to your outdoor space.