To install a universal trimmer head, remove the old head, line up the new head with the trimmer’s drive shaft, and secure it with the provided hardware. If you’re looking to replace your trimmer head with a universal one, you’ll need to follow a few simple steps.
Whether your old head is worn out or you just want to upgrade, installing a universal trimmer head can be done in no time. We’ll guide you through the process of removing the old head, aligning the new head, and securing it properly.
By the end, you’ll have a brand-new trimmer head ready to tackle any trimming task you have in mind. Let’s get started.
Preparing For Installation
Before you begin installing a universal trimmer head, make sure you have gathered all the necessary tools and materials. This will save you time and effort during the installation process.
Ensuring safety precautions are in place is crucial before starting the installation. This includes wearing protective gloves and eyewear to prevent any injuries. It is also recommended to disconnect the spark plug wire to avoid accidental starts.
Familiarizing yourself with the trimmer head components is essential to understand how they fit together. Take a moment to review the instruction manual and identify the different parts of the trimmer head.
Removing The Current Trimmer Head
Before you can install a universal trimmer head, you need to first remove the current trimmer head. Follow these steps:
- Disconnect the trimmer from the power source.
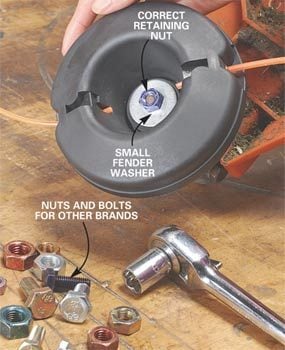
- Locate and remove the retaining bolt or nut that is holding the current trimmer head in place.
- Take out the old trimmer head and inspect it for any damage.
Once you have removed the old trimmer head, you can proceed with installing the new universal trimmer head of your choice. Make sure to carefully follow the manufacturer’s instructions for proper installation. With the new trimmer head in place, you’ll be ready to tackle your trimming tasks with ease.
Selecting The Right Universal Trimmer Head
Determining the compatibility of a trimmer head is crucial when installing a universal trimmer head. The first step is to consider the type of line that the trimmer head can accommodate. Whether you prefer nylon or metal lines, ensure that the universal trimmer head supports your chosen line type.
It is also essential to evaluate the cutting capacity of different universal trimmer head models. Look for a trimmer head with adjustable cutting heights to cater to various lawn care needs. This versatility will enable you to trim grass, weeds, and even heavier foliage with ease.
Comparing various universal trimmer head models is another critical aspect of selection. Look for features such as durable construction materials, ease of installation, and compatibility with your specific trimmer brand and model. Reading customer reviews can also provide useful insights into the performance and durability of different trimmer head options.
Installing The Universal Trimmer Head
Installing the universal trimmer head is a simple process that can be done in a few easy steps. First, insert the trimmer head onto the shaft of your trimmer. Make sure to align the holes on the head with the shaft. Once the head is in the correct position, secure it with the retaining bolt or nut. This will hold the head in place during use. Finally, tighten the bolt or nut securely to ensure that the head is firmly attached to the shaft.
Checking For Proper Installation
Ensure the trimmer head spins freely: Before starting the installation process, it is important to check that the trimmer head spins freely. Give it a gentle spin with your hand to make sure there are no obstructions or restrictions.
Verify that the trimmer head is securely attached: Once you have confirmed that the trimmer head spins freely, ensure that it is securely attached to the trimmer. Tighten any screws or bolts if necessary to prevent the trimmer head from becoming loose during operation.
Test the trimmer head by engaging the power: Finally, it is crucial to test the trimmer head by engaging the power. Start the trimmer and observe if the trimmer head rotates smoothly and without any vibrations. If you notice any issues, such as excessive wobbling or strain on the motor, immediately turn off the trimmer and recheck the installation.
Maintaining And Troubleshooting
Maintaining and Troubleshooting:
In order to keep your universal trimmer head working efficiently, it is important to regularly inspect and clean the trimmer head. In addition, replacing the trimmer line when necessary is crucial for optimal performance.
Inspecting and Cleaning: Regularly examining the trimmer head for any debris or grass buildup is essential to prevent clogging and ensure smooth operation. Clean the head thoroughly and remove any tangled material. This will help prevent line feeding problems and maintain a clean cutting path.
Replacing the Trimmer Line: When the trimmer line becomes worn out or breaks, it should be replaced promptly to maintain cutting efficiency. Follow the manufacturer’s instructions to ensure proper installation and tension of the new trimmer line.
| Common Issues | Solutions |
|---|---|
| Line Feeding Problems | Check for tangled line, clean the head, and ensure proper tension |
Line feeding problems can often be resolved by checking for tangled line, cleaning the head, and ensuring proper tension. These troubleshooting steps can help you get your universal trimmer head back to optimal performance.
Upgrading Your Trimmer Head
htmlUpgrading your trimmer head can improve the efficiency and performance of your trimmer. There are various advanced trimmer head options available that offer unique features and benefits. It is important to consider these options based on your specific needs and preferences. One important consideration is to explore the features and benefits of different trimmer head upgrades. Look for features such as easy line reloading, reduced vibration, and increased cutting efficiency. These upgrades can enhance the overall trimming experience and make your job easier and more efficient. Before installing the new trimmer head, it is crucial to carefully follow the manufacturer’s instructions. Each trimmer head may have specific installation steps that need to be followed for proper functioning and durability. By upgrading your trimmer head and following the instructions, you can optimize the performance of your trimmer and achieve better results in your trimming tasks.
Credit: www.familyhandyman.com
Frequently Asked Questions Of How To Install A Universal Trimmer Head
How Do You Install A Universal Bump Feed Trimmer Head?
To install a universal bump feed trimmer head, follow these steps: 1. Remove the old trimmer head by turning it counterclockwise. 2. Attach the universal bump feed trimmer head by screwing it clockwise onto the trimmer shaft. 3. Make sure it is securely fastened.
4. Load the trimmer line by following the manufacturer’s instructions. 5. Test the trimmer head to make sure it feeds properly.
How Do You Put A Trimmer Head Back On?
To put a trimmer head back on, follow these steps: 1. Remove any debris or old line from the trimmer head. 2. Insert the trimmer line into the trimmer head eyelets, following the manufacturer’s instructions. 3. Wind the line tight and evenly onto the trimmer head.
4. Push the line through the holes on the trimmer head until it’s secure. 5. Reattach the trimmer head onto the trimmer and tighten it.
Are All Trimmer Heads Interchangeable?
Not all trimmer heads are interchangeable. It depends on the brand and model of the trimmer. You need to make sure the trimmer head is compatible with your specific trimmer before purchasing.
Conclusion
Installing a universal trimmer head is a simple process that can greatly enhance the performance of your trimmer. By following the step-by-step guide provided in this blog post, you can ensure a smooth installation and enjoy the convenience of a versatile trimmer head.
Whether you are a gardening enthusiast or a professional landscaper, this upgrade is a must-have for maintaining a neat and tidy lawn. Take the time to install a universal trimmer head and see the difference it makes in your trimming tasks.