To install a chain link fence gate, first measure and mark the desired location for the gate. Then, attach gate hinges to the gate post and gate frame.
Credit: m.youtube.com
Gate Size: Determining The Right Dimensions
Gate Size: Determining the Right Dimensions
When installing a chain link fence gate, it is crucial to ensure the gate dimensions are correct. To do this, you need to properly measure the fence opening and estimate the gate width while factoring in the installation space.
| Subheading | Guideline |
|---|---|
| Measuring the Fence Opening | Measure the width of the opening between the fence posts. This will provide the gate’s width. |
| Estimating the Gate Width | Add extra space for the gate hardware, hinges, and latch. This ensures the gate fits securely within the opening. |
| Factoring in Installation Space | Consider the available space for the gate to swing open and allow for easy access. This will prevent any obstructions or limitations in the gate’s functionality. |
Gate Style: Enhancing Aesthetics And Functionality
Chain link fence gates not only provide security for your property but also enhance its aesthetics. There are several gate styles to choose from, each offering its unique combination of functionality and appeal.
Single Swing Gate: This gate style consists of a single panel hinged on one side, allowing it to swing open and close like a door. It is ideal for narrower openings and provides convenient access.
Double Swing Gate: Similar to a single swing gate, a double swing gate includes two panels that swing open from the center. This style is suitable for wider openings and offers a grander entrance.
Sliding Gate: A sliding gate operates horizontally along a track installed on the ground. It is an excellent choice for properties with limited space or uneven terrain, as it does not require extra clearance for the gate to swing open.
| Gate Style | Description |
|---|---|
| Single Swing Gate | A single panel gate that swings open and close like a door. Ideal for narrower openings. |
| Double Swing Gate | Consists of two panels that swing open from the center. Suitable for wider openings for a grand entrance. |
| Sliding Gate | Operates horizontally along a track on the ground. Ideal for properties with limited space or uneven terrain. |
| Rolling Gate | A large gate that rolls open and close on wheels. Often used for commercial and industrial properties. |
Rolling Gate: A rolling gate is a large gate that rolls open and close on wheels. It is typically used for commercial and industrial properties, providing ease of access and enhanced security.
By understanding the various gate styles available, you can choose the one that suits your property’s needs and enhances its overall look.
Gate Material: Selecting The Best Option
When choosing a material for your chain link fence gate, you have several options to consider. Each option has its own unique features and benefits:
| Galvanized Steel Gates |
|---|
| Galvanized steel gates are the most common and affordable option. They are coated with a layer of zinc to protect against rust and corrosion. These gates are durable and can withstand harsh weather conditions. |
| Vinyl-Coated Chain Link Gates |
|---|
| Vinyl-coated chain link gates offer added protection and aesthetic appeal. The PVC coating provides resistance to rust, and the gate is available in various colors to match your fence. These gates are low-maintenance and can enhance the overall look of your property. |
| Aluminum Gates |
|---|
| Aluminum gates are lightweight and durable. They are resistant to rust and can be powder-coated for added protection. These gates offer a sleek and modern appearance, making them a popular choice for residential and commercial properties. |
| Privacy Slat Gates |
|---|
| Privacy slat gates provide an extra layer of privacy to your chain link fence. These gates are available in various materials such as aluminum, PVC, or chain link with vinyl slats. They not only offer privacy but also reduce noise and wind. |
Consider your specific needs and preferences when selecting the best gate material for your chain link fence. Whether you prioritize affordability, aesthetic appeal, durability, or privacy, there is a gate material that will suit your requirements.
Tools And Materials Required
Installing a chain link fence gate is an essential step in completing your fencing project. To install the gate, you will need a few tools and materials:
| Post Hole Digger | Concrete Mix | Gate Hardware |
| Level | Tape Measure | Wrenches |
| Safety Gear (Gloves, Safety Glasses) | ||
Using a post hole digger, create holes in the ground for the gate posts. Mix and pour concrete into the holes to secure the posts in place. Attach the gate to the posts using gate hardware such as hinges and latches.
Ensure that the gate is level by using a level and make necessary adjustments. Measure the dimensions of the gate opening accurately with a tape measure. Use wrenches to tighten the hardware and secure everything in place.
Lastly, prioritize your safety by wearing appropriate safety gear like gloves and safety glasses while working on the installation.
Preparing The Fence Opening
To install a chain link fence gate, you first need to prepare the fence opening. Start by clearing the area and removing any obstructions to ensure a smooth installation process. Next, mark the position where the gate will be installed, ensuring it aligns with the existing fence. Once marked, dig the post holes deep enough to provide adequate stability for the gate. Remember to measure the width of the gate and adjust the hole positions accordingly.
After digging the post holes, fill them with concrete and place the gate posts securely into the holes. Ensure they are level and plumb before allowing the concrete to set. Once the concrete has hardened, attach the gate hardware and hang the gate. Make any necessary adjustments to ensure the gate opens and closes smoothly. Finally, ensure that the gate is properly aligned with the fence and the latch securely locks.
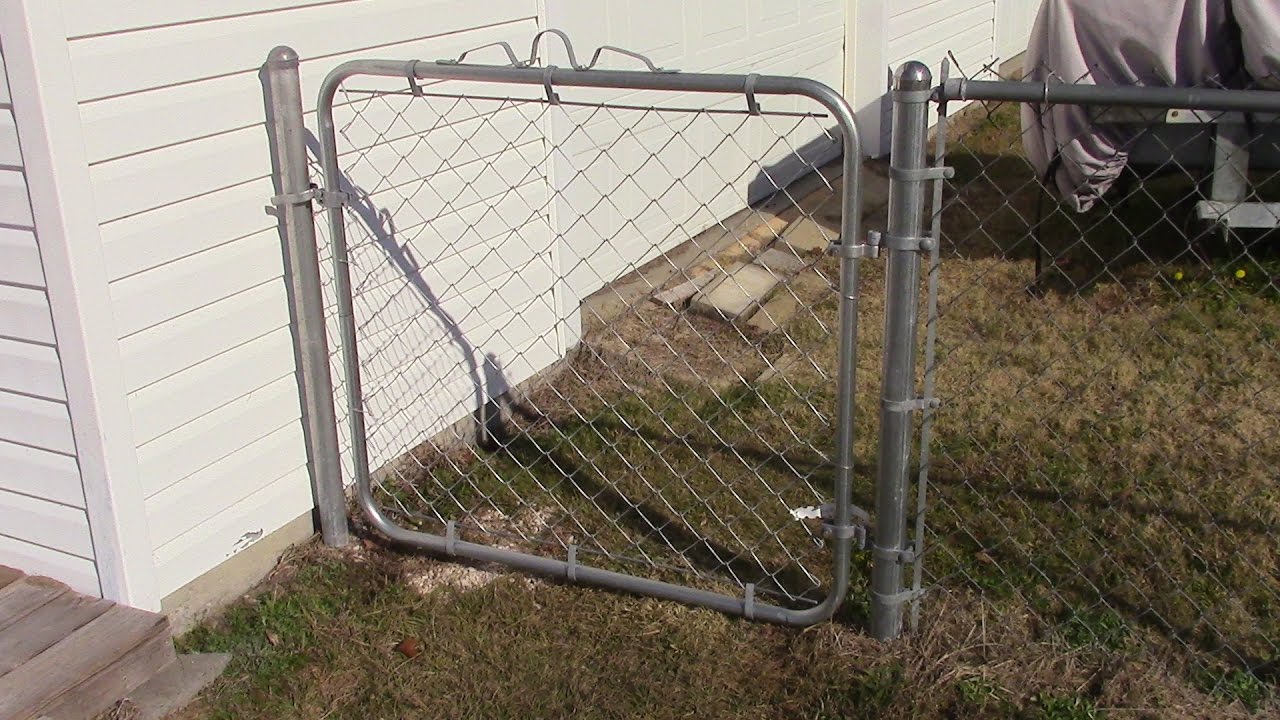
Installing Gate Posts
Installing Gate Posts: To install a chain link fence gate, start by first inserting the gate posts. Dig holes for the gate posts, ensuring they are deep enough and spaced according to the width of the gate. Insert the posts into the holes, making sure they are set securely and upright. Securing the Posts with Concrete: Next, secure the gate posts by pouring concrete around them. Use a level to ensure the posts are straight and plumb. Fill the holes with concrete, gradually adding water and mixing it well. Make sure the concrete is evenly spread around the posts for maximum stability. Allow the concrete to dry and cure completely before continuing with the installation. Checking for Alignment and Levelness: After the concrete has hardened, check the alignment and levelness of the gate posts. Use a level to ensure the posts are perfectly vertical and adjust if necessary. Additionally, measure the distance between the posts to ensure they are evenly spaced. This step is crucial in ensuring a proper and functional gate installation. Once the gate posts are securely in place, you can proceed with attaching the gate itself to complete the installation process. {{Table}}Attaching The Gate Frame
Assembling the gate frame is the first step in installing a chain link fence gate. Start by gathering the necessary materials, including the gate frame, hinges, latch, and hardware. Ensure the gate frame is the correct size and shape for your fence opening.
Next, attach the hinges to the gate frame. Position them on the top and bottom edges of the frame, making sure they align properly. Use screws or bolts provided with the hinges to secure them in place.
Once the hinges are attached, you’re ready to hang the gate. Position the gate in the desired location within the fence opening, ensuring it is level and plumb. The gate should swing freely without any obstructions. Connect the hinges on the gate to the corresponding hinges on the fence post, ensuring a secure attachment.
Overall, installing a chain link fence gate involves assembling the gate frame, attaching the hinges, and hanging the gate. Following these steps will help you successfully install a chain link fence gate and enhance the functionality of your fence.
Installing Gate Hardware
To install a chain link fence gate, you need to know how to install the gate hardware properly. One important aspect is installing the latch, which ensures the gate stays securely closed. Make sure to position the latch at a convenient height for easy access. You will also need to add tension bands and struts to provide stability to the gate. These components help keep the gate aligned and prevent it from sagging. Installing a gate brace is another crucial step. This horizontal piece of wood or metal strengthens the gate and prevents it from warping or twisting over time. By following these steps, you can successfully install the hardware for your chain link fence gate.
Finalizing The Installation
Finalizing the Installation
The last step to installing a chain link fence gate is to ensure its alignment and levelness. To do this, check that the gate properly aligns with the fence posts it connects to. Adjust the hinges if necessary, so the gate swings smoothly. Use a level to verify that the gate is perfectly horizontal and adjust as needed.
Testing the Gate Operation
Once the gate is aligned and level, test its operation by swinging it open and closed. Make sure it opens and closes smoothly and that the latch functions correctly. Adjust the hinges, latch, or tension bands if needed to ensure proper operation.
Finishing Touches: Trimming Excess Chain Link, Etc.
After finalizing the installation and testing the gate, it’s time for some finishing touches. Start by trimming any excess chain link to give the fence a clean appearance. Use wire cutters to cut off any excess links to match the height of the fence line.
Additionally, consider adding a gate lock or latch to secure the gate. This will provide added security and peace of mind. Finally, step back and admire your newly installed chain link fence gate!
Frequently Asked Questions Of How To Install Chain Link Fence Gate
How Do You Install A Gate In A Chain Link Fence?
To install a gate in a chain link fence, first, measure the opening for the gate. Then, attach the gate hardware to the posts and hang the gate. Finally, adjust the gate and secure it using screws or bolts.
How Far Apart Are The Posts For A Chain Link Gate?
The posts for a chain link gate are typically installed 8-10 feet apart.
How Do You Set A Chain Link Gate Post?
To set a chain link gate post, follow these steps: 1. Dig a hole deep enough to accommodate the post. 2. Insert the post into the hole, making sure it’s plumb and level. 3. Backfill the hole with concrete, tamping it down firmly.
4. Allow the concrete to cure for the recommended time. 5. Attach the gate hardware to the post, ensuring it is securely fastened. Remember to follow the manufacturer’s instructions for your specific gate and post.
How Do You Install A Metal Fence Gate?
To install a metal fence gate: 1. Measure the gate opening and choose a gate that fits. 2. Dig holes for the gate posts and set them in concrete. 3. Attach the gate hardware to the gate and posts. 4. Hang the gate onto the hardware.
5. Test the gate to ensure it opens and closes smoothly.
Conclusion
Installing a chain link fence gate can be a straightforward process if you follow the proper steps. By gathering the necessary tools, measuring accurately, and securing the gate securely, you can create a durable and functional fence. Remember to regularly maintain and inspect your gate to ensure its longevity.
With these tips in mind, you can confidently install a chain link fence gate and enhance the security of your property.