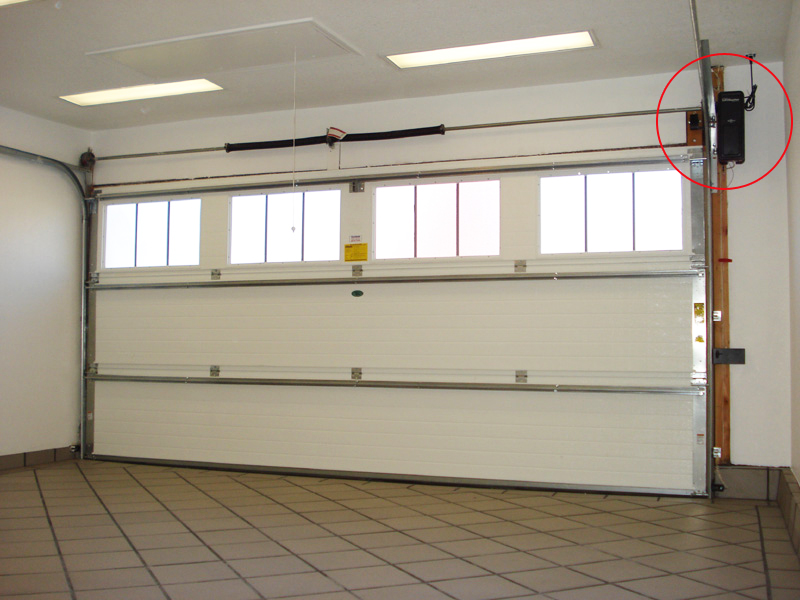
To install Liftmaster 8500, follow these steps: 1. Attach the mounting bracket to the Ceiling and wall 2.
Install the power unit on the bracket. More detailed installation instructions can be found in the Liftmaster 8500 manual. Are you in need of a garage door opener that combines convenience and space-saving features? Look no further than the Liftmaster 8500, a highly acclaimed and sought-after model renowned for its sleek design and functionality.
In this comprehensive guide, we will walk you through the simple yet precise process of installing the Liftmaster 8500. So, whether you are a DIY enthusiast or a professional installer, get ready to embark on a hassle-free installation journey that will enhance the accessibility and security of your garage. Now, let’s dive into the installation of Liftmaster 8500 and bring your garage door experience to the next level.
Tools And Materials Needed
htmlTo successfully install the Liftmaster 8500, you will need the following tools and materials:
- Battery-powered drill
- Screwdriver set
- Tape measure
- Level
- Socket wrench set
- Stepladder
- Wire cutter
- Pliers
- Electrical tape
- Wire connectors
- Cable ties
- Liftmaster 8500 garage door opener kit (including all necessary components)
Credit: www.pca.org
Preparing For Installation
Preparing for Installation
Before you start installing the Liftmaster 8500 garage door opener, it’s important to ensure that your existing setup is compatible with the Liftmaster 8500 model. Make sure to check the specifications and compatibility requirements provided by the manufacturer.
In order to create a clutter-free workspace for the installation, it’s crucial to clear out the area and declutter your garage. This will provide you with the necessary space and freedom of movement to work comfortably.
Once the area is clear, gather all the necessary tools and materials required for the installation. This may include a ladder, pliers, screwdriver, and any specific components or hardware that come with the Liftmaster 8500 package. Having everything in one place will save you time and ensure a smooth installation process.
Installing The Liftmaster 8500
Installing the Liftmaster 8500 is a relatively straightforward process that can be completed in a few simple steps. Step 1: Begin by mounting the powerhead bracket to the ceiling, ensuring proper alignment and positioning. Step 2: Next, attach the rail assembly to the powerhead bracket, making sure it is properly positioned. Step 3: Once the rail is in place, secure the motor unit to the powerhead bracket and connect it to the rail assembly. Step 4: Then, attach the trolley to the rail assembly and mount the door bracket on the garage door. Step 5: Position the safety reversing sensors on both sides of the garage door and connect them to the motor unit. Step 6: Connect the opener arm to the trolley and adjust it for proper operation. Step 7: Route and connect the wiring properly before testing the wiring and connections. Step 8: Finally, adjust the travel limits and force settings for smooth door operation. Following these steps will ensure a successful installation of the Liftmaster 8500 garage door opener.
Testing And Troubleshooting
Testing and Troubleshooting
Performing a safety reversal test is an important step in checking the functionality of the Liftmaster 8500. To do this, start by placing a 2×4 piece of wood on the ground where the door closes. Once the door touches the wood, it should automatically reverse. If it doesn’t, you may need to adjust the sensitivity settings or inspect the sensors for any blockage or misalignment.
Troubleshooting common installation issues can help ensure the Liftmaster 8500 operates smoothly. One common issue is the door not closing or opening fully. This can be due to incorrect adjustments in the travel limits or force settings. Check the user manual for instructions on how to adjust these settings correctly.
Another common issue is the remote control not functioning properly. Ensure the remote batteries are fresh and installed correctly. Additionally, check for any interference from nearby devices such as wireless routers. If these steps don’t resolve the issue, you may need to reprogram the remote control or consult the manufacturer’s support.
Maintenance And Safety Tips
Regular maintenance is crucial for ensuring optimal performance of your Liftmaster 8500 garage door opener. Here are some important tips to keep in mind:
- Inspect and lubricate all moving parts, such as the rail, chain, and rollers, on a regular basis.
- Check the tension of the garage door spring and adjust if necessary.
- Test the safety reversal system by placing an object in the door’s path and making sure it reverses when closing.
- Keep the area around the garage door opener clean and free from debris.
- Regularly check and tighten any loose screws or bolts.
When operating the Liftmaster 8500, it is important to follow these safety precautions:
- Keep fingers, hands, and other objects away from the moving parts.
- Avoid operating the opener while people or pets are under the door.
- Always close the door completely before leaving the premises.
- Do not attempt to repair or adjust the opener yourself, unless you are qualified to do so.
If you encounter any issues with your Liftmaster 8500, here are some troubleshooting tips:
- Check the power supply and ensure it is properly connected.
- Make sure the remote control batteries are fresh.
- Inspect the sensors and ensure they are aligned and clean.
- Refer to the user manual for any specific troubleshooting steps.
Conclusion And Final Thoughts
Recap of the installation process and key points:
- Preparation: Before starting the installation, make sure you have all the necessary tools and materials.
- Step-by-step guide: Follow the detailed instructions provided in the Liftmaster 8500 installation manual. It is crucial to read and understand each step before proceeding.
- Mounting the unit: Begin by mounting the power head bracket to the ceiling. Ensure that it is securely attached.
- Attaching the rails: Connect the horizontal and vertical sections of the rail together, following the provided instructions. Use a level to ensure proper alignment.
- Wiring: Connect the necessary wires to the power head according to the diagram provided. Securely fasten the wires.
- Testing and adjustments: Once the installation is complete, test the Liftmaster 8500 to ensure it is functioning properly. Make any necessary adjustments for optimal performance.
Final thoughts on the Liftmaster 8500 installation experience:
Installing the Liftmaster 8500 can be a straightforward process if you carefully follow the provided instructions. The step-by-step guide and clear diagrams assist in making the installation less daunting. Taking the time to properly align the rails and securely attach the various components will ensure a reliable and efficient operation. It is important to remember that safety precautions must be taken during the installation process. Testing the unit and making any necessary adjustments will provide peace of mind knowing that your Liftmaster 8500 is installed correctly and ready to serve its purpose.
Frequently Asked Questions Of How To Install Liftmaster 8500
How Big Of A Door Can A Liftmaster 8500 Lift?
The LiftMaster 8500 can lift doors of various sizes.
What Are The Disadvantages Of A Jackshaft Garage Door Opener?
Disadvantages of a jackshaft garage door opener include limited lifting capacity, higher cost compared to other options, and a potential need for professional installation. Additionally, it may not be compatible with all garage door types and can require more maintenance than other opener types.
Does Liftmaster 8500 Have Battery Backup?
No, the LiftMaster 8500 does not have a battery backup.
Conclusion
Learning how to install the Liftmaster 8500 can be a simple and straightforward process. By following the step-by-step instructions provided, you can safely and efficiently set up this garage door opener. Remember to take your time, double-check all connections, and follow any manufacturer guidelines.
With the Liftmaster 8500 properly installed, you can enjoy the convenience and security of a reliable garage door opener for years to come.