To install Trex decking with screws, begin by securing the first deck board with two screws at each joist, then insert two screws at each joist for all subsequent boards, leaving a gap between each board for expansion. Now let’s delve into the details of how to properly install Trex decking with screws.
Installing Trex decking with screws requires careful attention to detail to ensure a secure and long-lasting deck. By following the correct steps, you can achieve a professional-looking installation that will withstand the test of time. From securing the first deck board to leaving appropriate spacing between boards, this guide will provide you with the necessary instructions to complete the job accurately.
So, let’s get started!
Materials Needed
Materials Needed:
- Trex decking boards
- Deck screws
- Drill
- Tape measure
- Decking spacers
- Chalk line
- Speed square
- Safety goggles
- Work gloves
- Screwdriver
When installing Trex decking with screws, it is important to have the necessary materials handy. Start by gathering Trex decking boards, which will serve as the foundation of your deck. Additionally, you will need deck screws to secure the boards in place. A drill and tape measure will be useful for precise measurements and drilling holes where the screws will go. Decking spacers can help provide even spacing between boards, while a chalk line and speed square will assist in ensuring straight lines and angles. It is crucial to prioritize safety, so don’t forget to wear safety goggles and work gloves when handling tools and materials. Lastly, a screwdriver will be required for tightening the screws securely.
Preparing The Decking Area
When installing Trex decking with screws, it’s important to properly prepare the decking area. Start by clearing the area of any debris or obstructions. This will ensure a clean and smooth installation process.
Next, measure and mark the deck layout to determine the required number of decking boards. This step is crucial in order to accurately calculate and purchase the right amount of material. By carefully measuring and marking, you can minimize waste and avoid unnecessary expenses.
Once the area is cleared and measurements are taken, you can proceed with the installation process. TrThis includes securing the decking boards using screws and following the manufacturer’s guidelines. By being meticulous throughout the preparation and installation process, you can ensure a successfully installed Trex decking that will withstand the test of time.
Planning The Installation
Planning the installation of a Trex decking project involves various important considerations. One of these is choosing the right deck board pattern, which will affect the overall appearance of the deck. By selecting a pattern that complements the architectural style of your home, you can create a visually appealing outdoor space.
Calculating the quantity of screws needed is another crucial step in the installation process. It is recommended to use stainless steel or composite deck screws that are specifically designed for use with Trex decking. By accurately determining the number of screws required, you can ensure that you have enough to complete the installation without running out.
Determining the spacing between the boards is essential for both aesthetic and functional reasons. Proper spacing allows for expansion and contraction of the deck boards with changes in temperature and humidity. This helps prevent warping and buckling over time. Depending on the specific Trex decking product you are using, there may be specific guidelines for board spacing that should be followed.
Credit: uk.trex.com
Installing The Trex Decking
Installing Trex decking with screws is a straightforward process that can enhance the aesthetic and functionality of your outdoor space. To begin, it is recommended to start with the perimeter boards for a solid foundation. Pre-drilling pilot holes for the screws is crucial to prevent any splitting or cracking of the boards. Next, attach the first board, ensuring it is correctly aligned and secured with screws. Then, continue securely fastening the rest of the boards, maintaining a consistent spacing between each one.
To achieve the desired spacing, decking spacers can be used. These handy tools ensure an even and professional-looking installation. Additionally, when encountering obstructions such as posts or trees, cutting and fitting the boards accordingly will create a seamless finished appearance.
By following these steps, you can successfully install Trex decking with screws, creating a beautiful and durable outdoor deck that will stand the test of time.
Handling The Final Boards
When installing Trex decking with screws, it is important to handle the final boards with precision. Measuring and cutting the last boards accurately ensures a seamless and professional finish to your deck. Before attaching the final boards, pre-drilling is recommended to prevent splitting and ensure secure fastening. By pre-drilling holes, you can easily insert screws without damaging the boards.
To measure and cut the last boards, carefully mark the desired length on the board using a tape measure and pencil. Use a circular saw or miter saw to make precise cuts, ensuring clean edges. Once the final boards are cut to size, it is time to pre-drill. Select an appropriate drill bit size and drill pilot holes at regular intervals along the length of the boards. After pre-drilling, align the boards in their desired position and attach them securely using screws.
By following these steps, you can successfully install Trex decking with screws, creating a beautiful and durable deck for your outdoor space.
Securing The Fascia Boards
htmlTo install Trex decking with screws, one important step is securing the fascia boards. Properly measuring and cutting the fascia boards ensures a precise fit. Start by measuring the desired length of the boards, making sure to account for any necessary overhang. Cut the boards to the correct length using a saw, ensuring clean and straight cuts.
When attaching the fascia boards to the deck frame, it is crucial to use screws that are suitable for outdoor use and can withstand the elements. Stainless steel screws are a popular choice for their durability. Make sure to space the screws evenly along the length of the boards, ensuring a secure attachment.
By following these steps to secure the fascia boards with screws, you can ensure a professional and long-lasting installation of Trex decking.
Inspecting And Finishing Touches
Before you begin installing Trex decking with screws, it is important to inspect the deck for any loose boards or screws. This will ensure a sturdy and secure installation. Walk around the deck and check for any boards that may be cracked or damaged. Additionally, look for any screws that may have come loose over time. If you notice any issues, tighten or replace the screws as needed to ensure a solid foundation.
Once the inspection is complete, you can apply any necessary touch-ups to the deck. This may include sanding down any rough spots or patching any small cracks. Take the time to clean the deck thoroughly, removing any debris or dirt that may have accumulated.
By performing a thorough inspection and applying any necessary touch-ups, you can ensure that your Trex decking installation is seamless and long-lasting.
Frequently Asked Questions Of How To Install Trex Decking With Screws
Can You Just Screw Down Trex Decking?
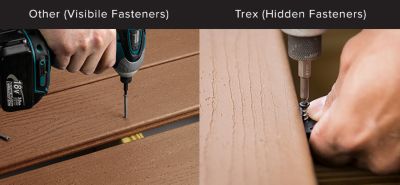
No, you can’t just screw down Trex decking. Proper installation is crucial, as it requires hidden fasteners or clips for a secure and seamless finish.
Do You Need To Pre Drill Trex Decking?
Yes, drilling is recommended for Trex decking to avoid splitting and ensure proper installation. Pre-drilling holes helps prevent damage and allows for easier insertion of screws. By following this guideline, you can ensure a successful and sturdy deck with your Trex decking.
How Far Apart Should Trex Decking Screws Be?
Trex decking screws should be spaced approximately 16 inches apart for optimal installation.
What Is The Best Way To Fasten Trex Decking?
The best way to fasten Trex decking is by using deck screws that are specifically designed for composite decking. Make sure to pre-drill the screw holes to prevent any splitting. Start by attaching the first board with a screw in each joist, and then continue screwing down the rest of the boards, spacing them evenly.
Conclusion
Installing Trex decking using screws is a straightforward process that can enhance the beauty and longevity of your outdoor space. By following the steps outlined in this guide, you can achieve a secure and durable deck that will withstand the test of time.
Remember to choose the right type and size of screws, and to follow the manufacturer’s instructions for best results. Whether you’re a DIY enthusiast or a professional carpenter, using screws to install Trex decking is a reliable and efficient option for creating a stunning outdoor space that will impress for years to come.