To install a U post fence, start by measuring and marking the exact placement of the posts. Then, dig holes for the posts, ensuring they are deep and wide enough for stability.
Finally, place the posts in the holes, backfill with concrete or gravel, and secure the fence panels to the posts. Installing a U post fence involves measuring, digging holes of sufficient depth and width, placing the posts in the holes, and securing the fence panels.
Benefits Of Installing U Post Fence
Installing a U Post Fence offers numerous benefits for your property. One of the main advantages is that it provides increased security and safety. The sturdiness and structural integrity of the U-shaped posts make it difficult for intruders to trespass onto your premises.
Another key benefit is that U Post Fences are durable and long-lasting. Made of high-quality materials, these fences can withstand harsh weather conditions, ensuring they remain in good condition for years to come.
The versatile design of U Post Fences also makes them a great choice. They can be easily customized to suit various landscapes, whether you have a flat or sloping terrain. Additionally, they can be used to delineate different areas of your property, such as gardens or play areas.
Lastly, U Post Fences are a cost-effective option compared to other types of fencing. They require minimal maintenance and are relatively easy to install, saving you on both time and money.
| Benefits of Installing U Post Fence |
|---|
| Increased security and safety for your property |
| Durable and long-lasting fencing solution |
| Versatile design that complements various landscapes |
| Cost-effective option compared to other fencing types |
Preparing For U Post Fence Installation
Preparing for U Post Fence Installation
Before installing a U post fence, there are a few key steps you need to take. First, determine the boundary and measurements of your fence. This will help you decide how many U posts and panels you will need. Next, analyze the soil conditions to ensure proper installation. Soft or sandy soil may require additional support. Once you have determined the boundary and analyzed the soil, gather the necessary tools and materials. You will need U posts, panels, a post driver, a level, and concrete mix. Finally, it is important to check local regulations and obtain any necessary permits. Some areas may have specific guidelines for fence installation, so be sure to comply with these requirements.
Step 1: Marking And Layout
Before installing a U post fence, it is important to properly mark and layout the fence line. This will ensure that the fence is installed in the correct location and will help guide the installation process.
Marking The Fence Line With Stakes And Twine
To mark the fence line, start by placing stakes at the beginning and end points of the fence. Then, stretch twine between the stakes, ensuring that it is taut. This will create a straight line that indicates where the fence will be installed.
Determining The Spacing Between U Posts
Next, determine the spacing between U posts. This will depend on the type of fence and the desired level of stability. As a general rule of thumb, U posts should be spaced around 8 feet apart for most fences. However, if the fence will be used to contain livestock or provide extra security, closer spacing may be necessary.
Planning For Gates And Corners
Lastly, consider any gates or corners that will be included in the fence design. These areas require special attention and may require additional materials or techniques. Plan ahead to ensure that gates and corners are properly accounted for in the layout and installation process.
Step 2: Digging Post Holes
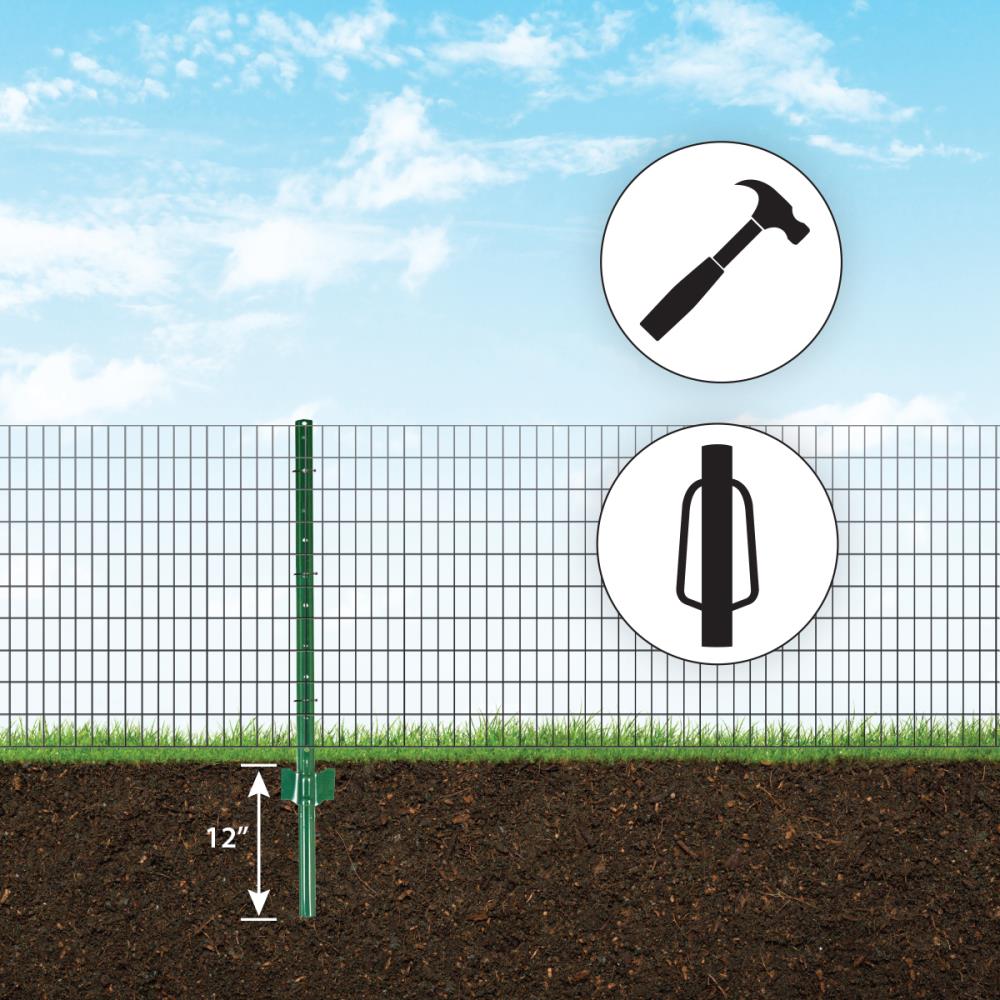
When it comes to installing a U post fence, one of the most important steps is digging the post holes. Using a post hole digger or auger can make this process much easier and efficient. It is crucial to ensure that the holes are dug to the proper depth and diameter for stability.
Before starting to dig, make sure you have the correct measurements for the post holes. The depth of the hole will depend on the height of the fence you are installing, as well as the type of soil you have. As a general rule, the holes should be approximately one-third the height of the fence.
When using a post hole digger or auger, it is important to insert it into the ground at a slight angle and twist it back and forth. This will help break up the soil and make it easier to dig deeper. Take your time and remove any excess soil from the hole as you go.
Once the hole is dug to the desired depth, check its diameter to ensure it provides enough space for the post. A too narrow hole may result in a loose and unstable fence. On the other hand, a hole that is too wide may require excessive backfilling, which can limit the stability of the fence as well.
By following these steps and ensuring proper hole depth and diameter, you can lay the foundation for a sturdy U post fence.
Step 3: Installing U Posts
To install U post fence, you need to follow proper steps. One of the crucial steps is installing U posts, which plays a vital role in providing support and stability to the fence. To begin, place the U posts in the pre-dug holes along the fence line. Ensure that they are evenly spaced and at the correct height. Adjust their position and alignment using a level or by visually aligning them with nearby posts. This will help keep the fence straight and aesthetically pleasing.
Once the U posts are properly positioned, the next step is to add concrete or gravel for stability. Concrete can be poured into the holes around the U posts, ensuring that the posts are fully embedded. Allow the concrete to cure as per the manufacturer’s instructions before proceeding further. Alternatively, adding gravel around the U posts can provide sufficient stability, especially in areas where concrete is not required or preferred.
Credit: www.lowes.com
Step 4: Attaching Rails And Panels
After setting up the U post fence and securing it firmly in place, it’s time to move on to the next step: installing horizontal rails and brackets. To ensure stability and durability, the rails should be attached at the appropriate heights on the U posts using brackets. Firmly secure the brackets to the posts, making sure they are level and aligned correctly. This will provide a secure base for affixing the fence panels.
Once the rails are in place, it’s time to attach the fence panels. Position the panels between the posts, ensuring they are evenly spaced and aligned correctly. Secure the panels to the rails using screws or nails, depending on the type of material used. Pay careful attention to the vertical alignment and levelness of the panels to ensure a visually appealing and functional fence.
By following these steps and taking the time to properly attach the rails and panels, you can confidently install a sturdy U post fence that will enhance the security and aesthetics of your property.
Step 5: Securing The Fence
After completing the previous steps of installing a U post fence, it is important to take the necessary measures to secure the fence properly. This includes adding tension bands and fence ties to ensure that the fence stays in place. Tension bands help to keep the chain link fence taut, preventing any sagging or movement. Fence ties are used to attach the chain link fabric to the tension bands and U posts securely.
If you have a gate in your fence, it is also crucial to install the necessary gate hardware, such as hinges and latches. This will ensure that the gate functions properly and is securely attached to the fence.
Lastly, double-check the entire fence for any loose connections. Tighten any loose nuts and bolts and ensure that the chain link fabric is properly attached to the U posts. This will prevent any potential issues with the fence in the future and help to maintain its stability.
Regular Cleaning And Inspections
To maintain the durability and functionality of your U Post Fence, regular cleaning and inspections are essential. Start by removing debris and dirt from the fence, using a brush or a power washer with a low-pressure setting. This will help prevent the accumulation of dirt and grime, which can eventually lead to corrosion. Next, carefully inspect the fence for any signs of damage or wear. Look for bent or broken posts, loose or missing fasteners, and any signs of rust or corrosion. If any issues are found, make the necessary repairs or replacements as soon as possible. By regularly cleaning and inspecting your U Post Fence, you can ensure its longevity and effectiveness in providing security and privacy for your property.
Repairs And Replacements
Loose or damaged panels are a common issue with U post fences. To fix them, start by identifying the loose or damaged panels. Secure them back in place by tightening the screws or nails holding them. If the panels are severely damaged, consider replacing them entirely with new ones to ensure the fence’s stability.
Another common problem can be broken U posts. If you notice any broken posts, remove them carefully and replace them with new ones. Make sure to choose the same length and type of U post to maintain uniformity.
Finally, to preserve the longevity of your U post fence, consider painting or staining it. This not only enhances its appearance but also protects it from weathering and rotting. Choose a high-quality paint or stain specifically designed for outdoor use, and follow the manufacturer’s instructions for proper application.
Seasonal Maintenance
Seasonal maintenance is essential to ensure the longevity and durability of a U post fence. One important step in the maintenance process is preparing the fence for harsh weather conditions. This can be done by applying protective coatings to prevent rust.
Rust can be a major concern for metal fences, especially in areas with high humidity or rainfall. To protect the fence from rust, a coat of rust-resistant paint or a waterproof sealant can be applied. This will create a barrier between the metal and moisture, preventing the formation of rust.
Before applying the protective coating, it is important to clean the fence thoroughly. Remove any dirt, debris, or old paint using a wire brush or sandpaper. Ensure that the fence is completely dry before applying the coating.
Regularly inspecting the fence for signs of rust or damage is also crucial. If any rust spots are found, treat them immediately by removing the rust with a wire brush and applying a rust converter before applying the protective coating.
By following these steps and regularly maintaining the U post fence, you can prolong its lifespan and keep it looking great for years to come.
Frequently Asked Questions On How To Install U Post Fence
How Do You Install A U Post?
To install a U post, follow these steps: 1. Dig a hole at least 2 feet deep using a post hole digger. 2. Place the U post vertically into the hole and ensure it’s straight. 3. Use a level to make sure the post is perfectly vertical.
4. Fill the hole with concrete, ensuring the post remains in place. 5. Allow the concrete to dry before attaching any fencing or other structures.
How Deep To Bury A 12 Foot Post?
Bury a 12-foot post at least 3 feet deep in the ground for stability.
Should Fence Posts Be Set In Concrete?
Yes, fence posts should be set in concrete. Concrete provides stability, preventing posts from shifting or leaning over time. It ensures the fence remains durable and withstands various weather conditions.
How Deep Should An 8 Foot Post Be In The Ground?
An 8-foot post should be buried at least 2 feet into the ground for stability.
Conclusion
Installing a U Post fence is a simple and effective way to enhance your property’s security and aesthetics. By following the step-by-step instructions provided in this blog post, you can successfully complete the installation process. Remember to take accurate measurements, use proper tools, and ensure the posts are strongly anchored into the ground.
With the right technique and attention to detail, you’ll have a beautiful and sturdy U Post fence that will last for years to come. Don’t delay, start installing your U Post fence today!